Location Photography
Photographing the Dolomites:
A Two-Week Hiking & Photography Guide
Where to go, when to shoot, and which famous spots are actually worth the effort.
On this page:
Trip planning — flying in, hiring a car, where to base yourself, and why you should avoid staying in Cortina
Where to stay — the case for AirBnBs in smaller villages, and the two-base strategy that worked well for us
The walks (and photo spots) — every place we visited, with a straight take on the hike, the photography, and whether it's worth your time
Photography tips — gear, light, compositions, and how to mix iconic spots with quieter ones
Practical advice — booking parking, reading the weather, and what to bring
Trip Planning
We went for two weeks, and if you can spare the time, that's what I'd recommend. It lets you split across two bases, take in both the western valleys and the Cortina area at a relaxed pace, and keep a few days in reserve for weather.
A week still makes for an excellent trip. You'll have to choose which side of the region to focus on rather than trying to see all of it, and this guide is built to help you do exactly that. The walks below are grouped by base, so you can pick the area that suits you, do the best of it, and leave the rest for another time.
Getting there
Fly into Venice Marco Polo. It's the most straightforward option, and the drive into the mountains takes around two hours. Hire a car at the airport, because there's no practical way to do this trip without one.
Hire an SUV if you can.
Parking at popular trailheads fills quickly and you'll often end up on a roadside verge, so the extra clearance takes a lot of the stress out of the day. Whatever you hire, take the most comprehensive insurance on offer. Mountain roads and tight village streets have a way of finding bodywork, and we got caught out and successfully claimed it back.
When to go
The right month depends on what you want to shoot, and there are three real options.
Early September is the safe choice, and it's when we went. You get stable weather, the clearest air of the year, comfortable temperatures for long days on the trail, and thin crowds, with every cable car and rifugio still running a full schedule. The one thing you don't get is the larches, which are still green that early.
The larches are the thing most people don't plan around. They're conifers that turn gold and drop their needles in autumn, and they cover the Dolomites, so when they turn they light up whole hillsides against the grey rock. Colour peaks somewhere from late September at high elevation to mid-October lower down, and any single spot holds it for barely a week. If gold valleys are what you're picturing, you need to be here in October rather than September.
October has a cost, though. Many cable cars and rifugios close for the season from late September onwards, and several of the locations in this guide depend on those lifts, so you can arrive to find the easy way up shut. Early snow is possible, and restaurants start closing ahead of the ski season. You're trading guaranteed access for the best colour, and taking on more weather risk to get it.
June is the underrated third option. The wildflowers are at their peak, the days are long, and the meadows give you foreground colour you won't find any other time. The downsides are afternoon thunderstorms, snow lingering on the highest routes, and some lifts only just opening for the season.
What I'd actually do: if this is a hiking trip with serious photography alongside it, go in early September like we did, when access is guaranteed, the weather behaves, and the light is excellent. If the photography is the whole point and you're willing to gamble on closures and weather, aim for the first two weeks of October and chase the larches. Either way, skip August.
Booking and planning
Some popular trails now require you to book the parking, Tre Cime especially. Turning up without a booking means waiting over an hour for a coach, which is as frustrating as it sounds.
Use AllTrails to find the best walks around the famous areas, and to find shorter local walks for rainy days. My recommendations are below.
Check the forecast before committing to your best photography walks, and save the iconic spots for the clearest days.
Bring a serious waterproof.
2. Where to Stay

Avoid Cortina d'Ampezzo as a base. It's the most famous town in the Dolomites and priced to match, it gets crowded, and you'll struggle to find anywhere with decent views for an evening meal. The surrounding villages give you better access, better value, and a far more authentic feel.
Stay in AirBnBs. Self-catering is the right call for a trip like this. Italian produce is exceptional, cooking your own lunches saves money and lets you eat well on the trail, and having a kitchen gives you a flexibility that hotels don't. Even the smaller villages have good restaurants for the evenings you don't want to cook.
We used a two-base strategy, and it worked well.
Week one, Penia. A quiet village in the Val di Fassa, well-positioned for the western Dolomites. It's less famous than the Cortina area, which means quieter walks and more of that undisturbed alpine feeling. There's excellent hiking on the doorstep, including Lago di Fedaia just down the road. We enjoyed this week as much as the second, despite the walks being less well known.
Week two, San Vito di Cadore. Our preference of the two. Cheaper than Cortina, a good restaurant, and views to match. We had a terrace, which made the evenings. It's close enough to Cortina to reach all the famous walks easily, and far enough away to avoid the worst of the crowds and prices. If you can only do one base, make it here.
What to look for in accommodation
A terrace or outdoor space. Evenings in the Dolomites are worth sitting outside for.
Kitchen facilities, for packed lunches and keeping costs down.
Proximity to your priority walks rather than to a famous town.
3. The Walks (& Photo Spots)
The locations below are grouped by base, Penia in the west first, then San Vito di Cadore in the east. This mirrors the two-week structure I'd recommend, and it means each group naturally mixes the well-known with the quieter and less visited.
If you're only doing one week, use this to decide which base suits your priorities. Choose Penia or somewhere similar for a more local, less crowded experience with exceptional scenery. Choose San Vito or similar for access to the most iconic locations without Cortina's prices.
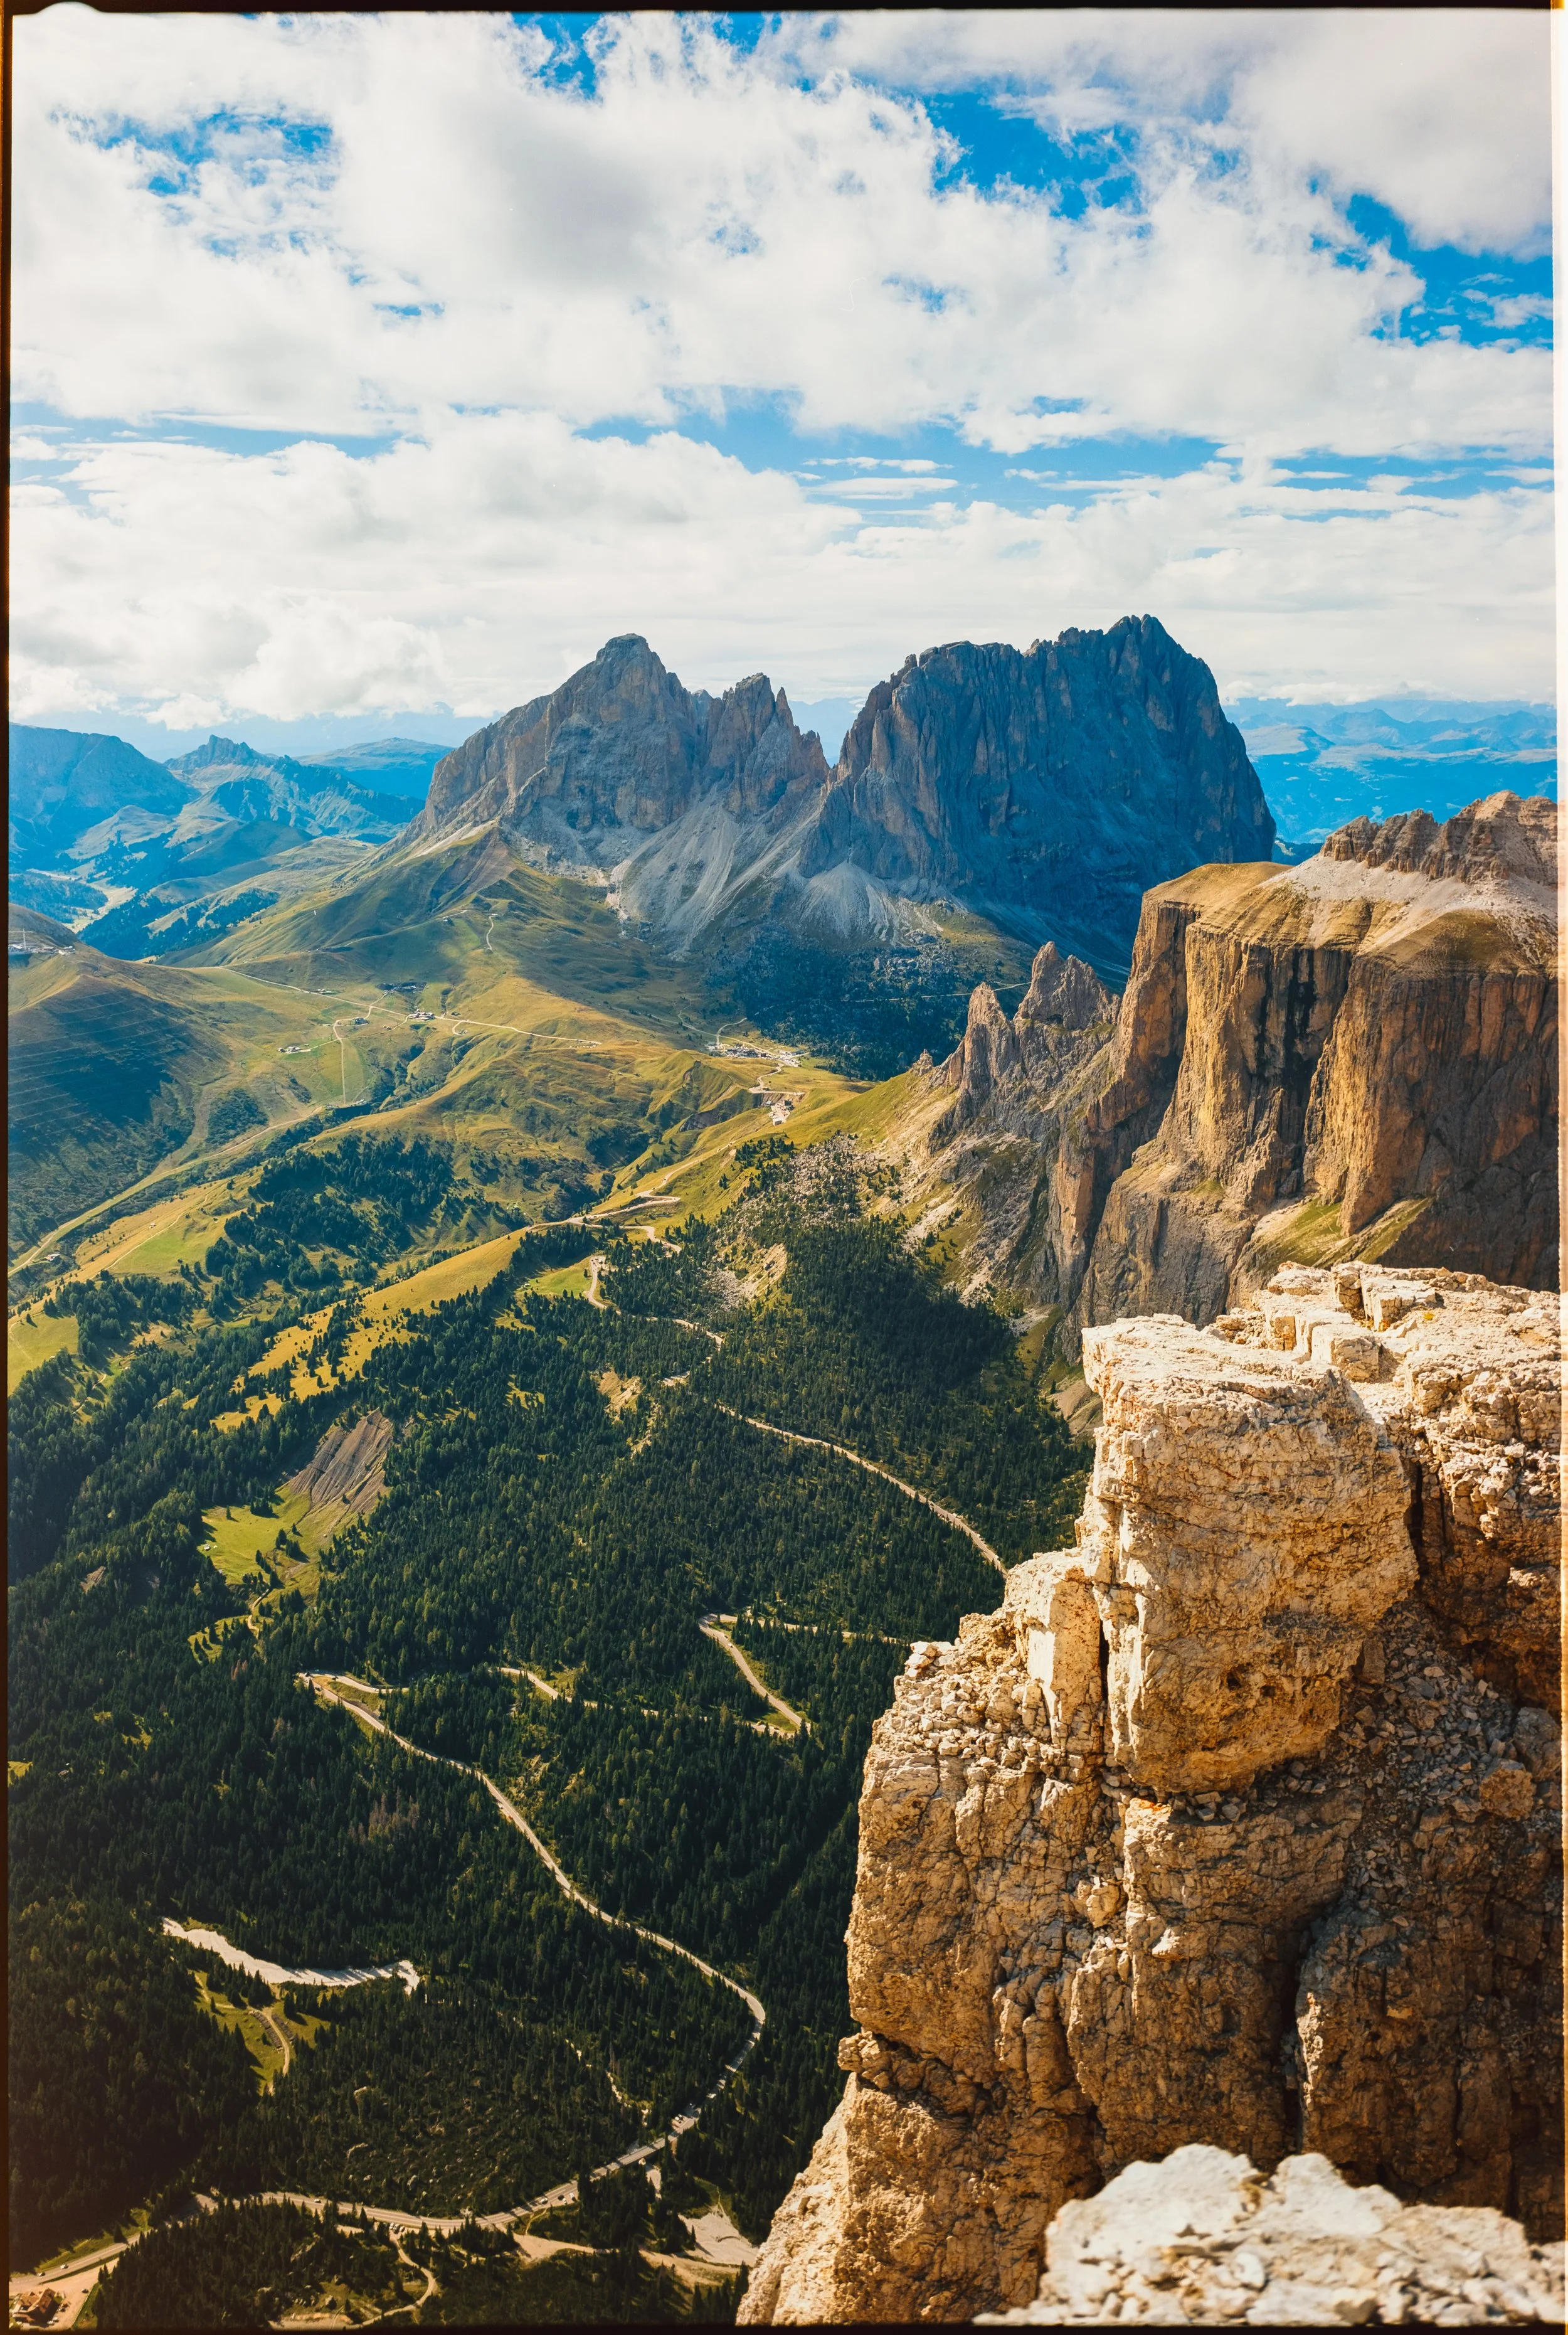
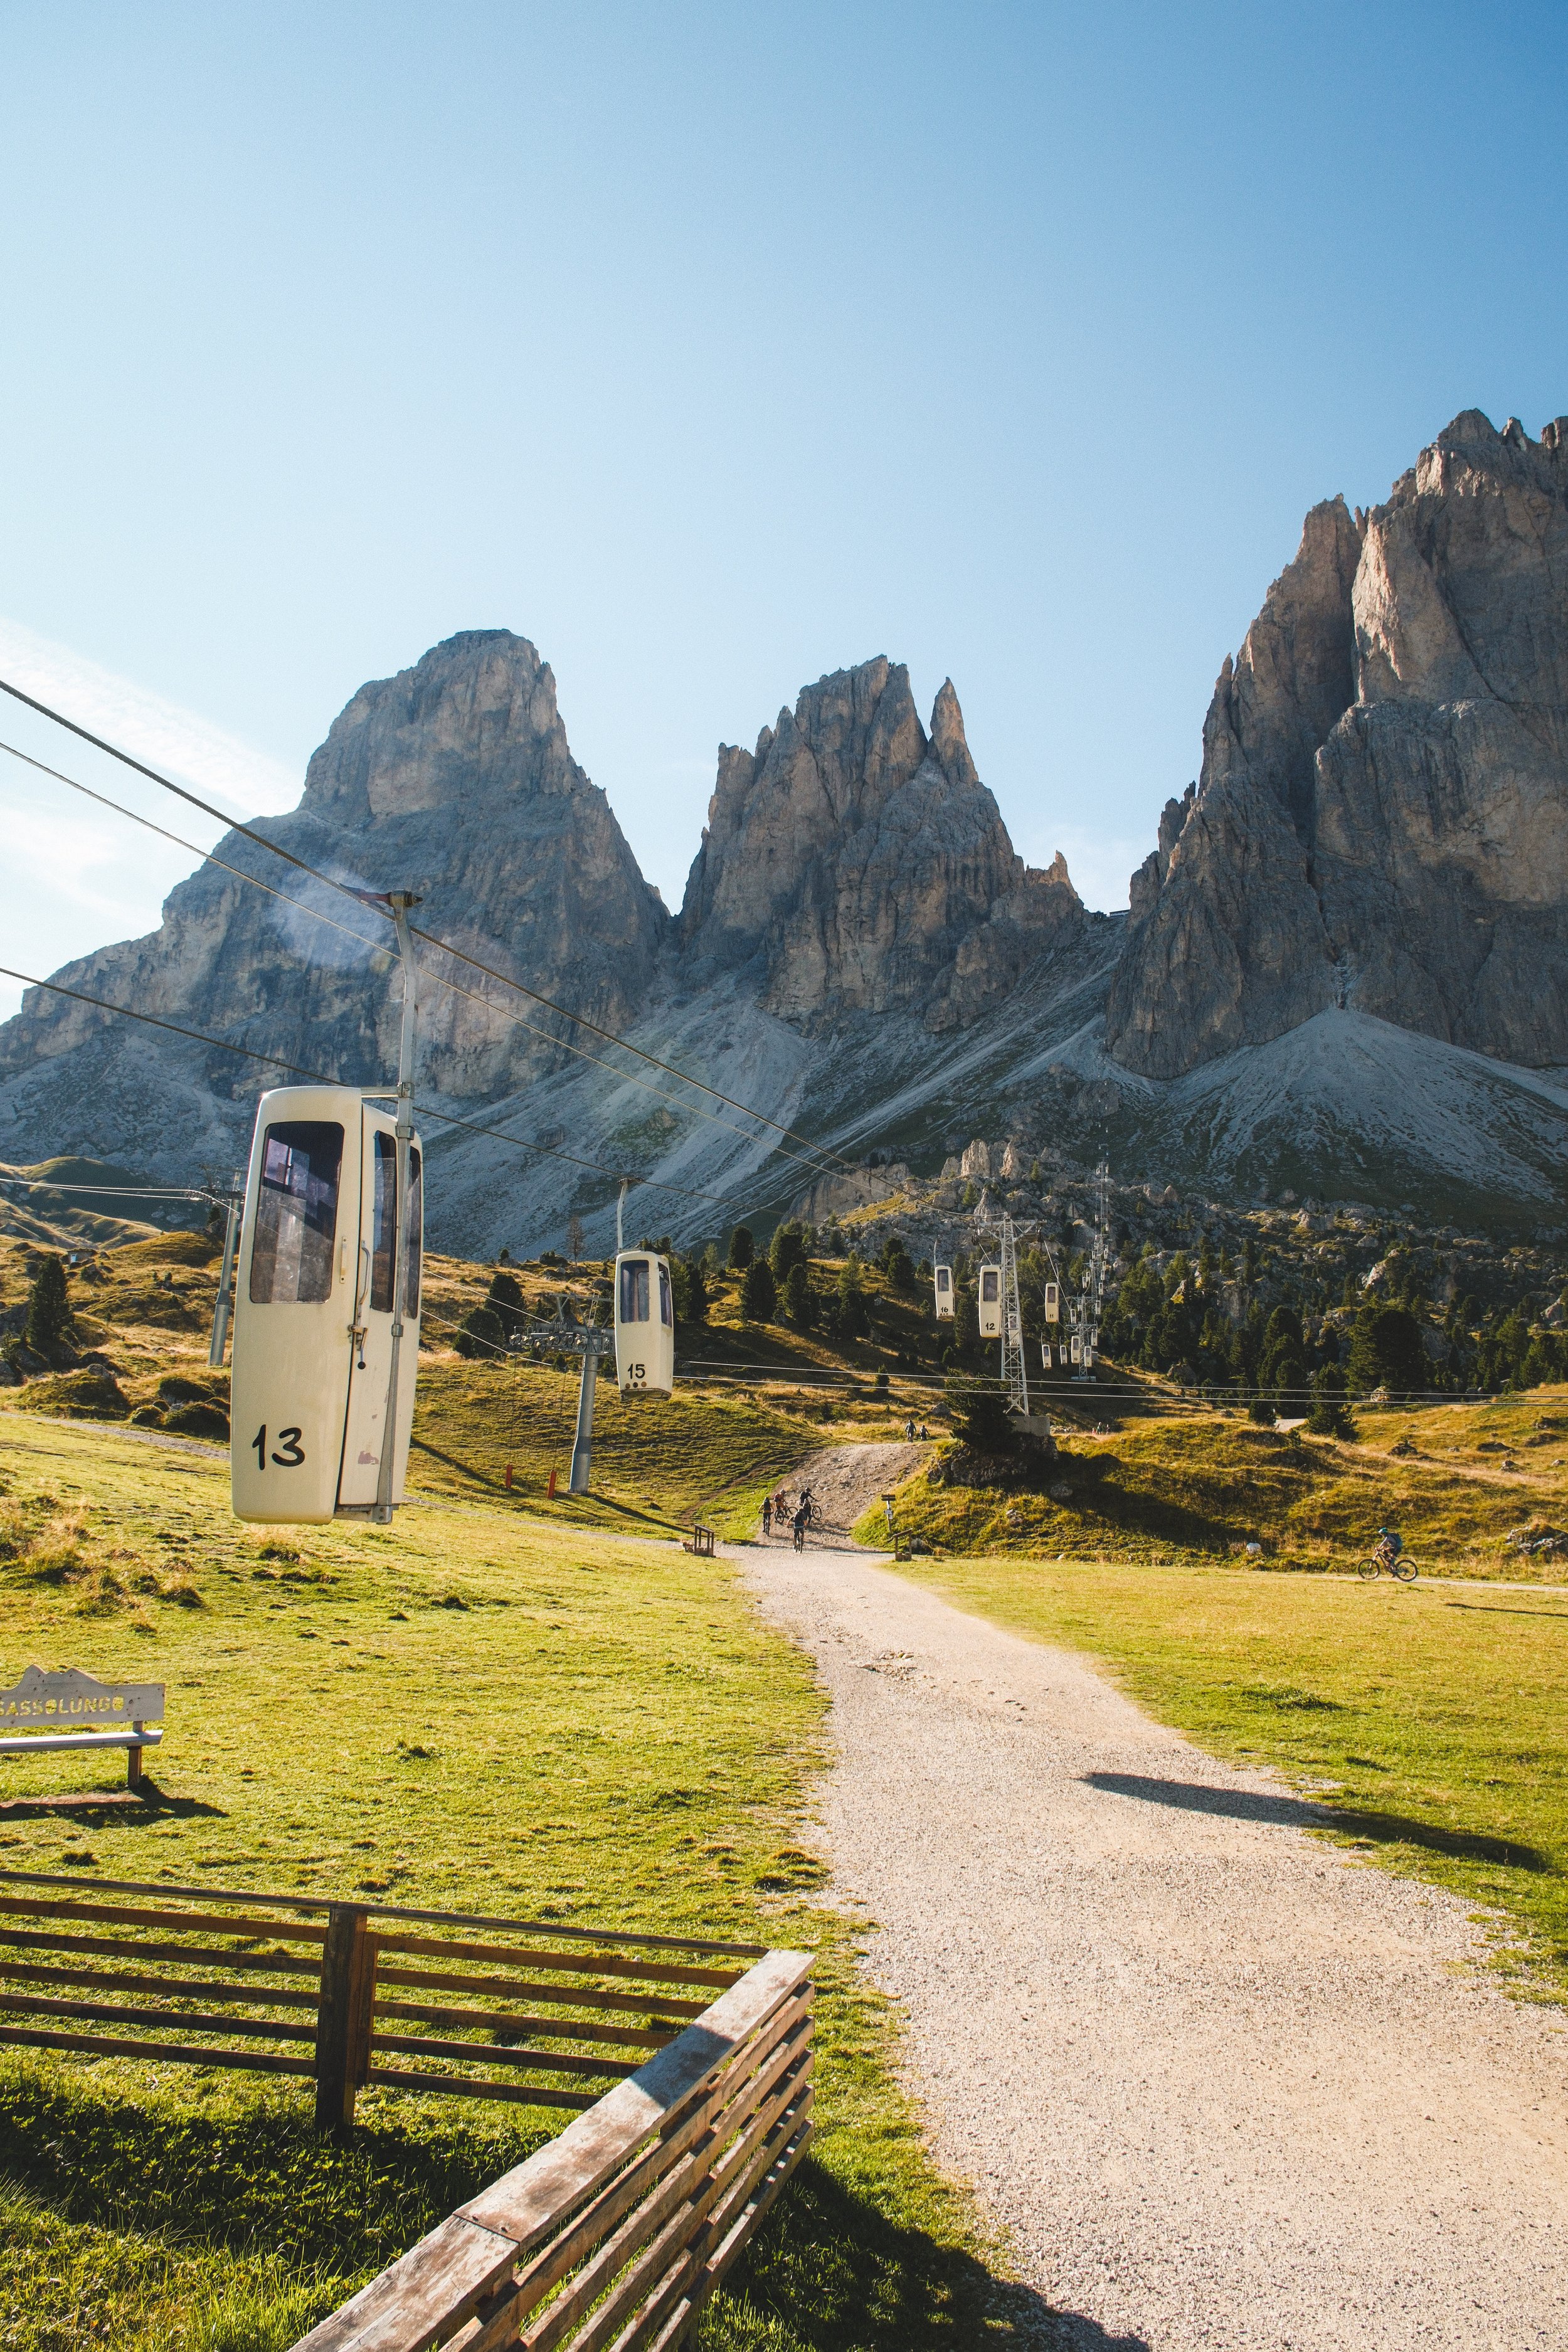
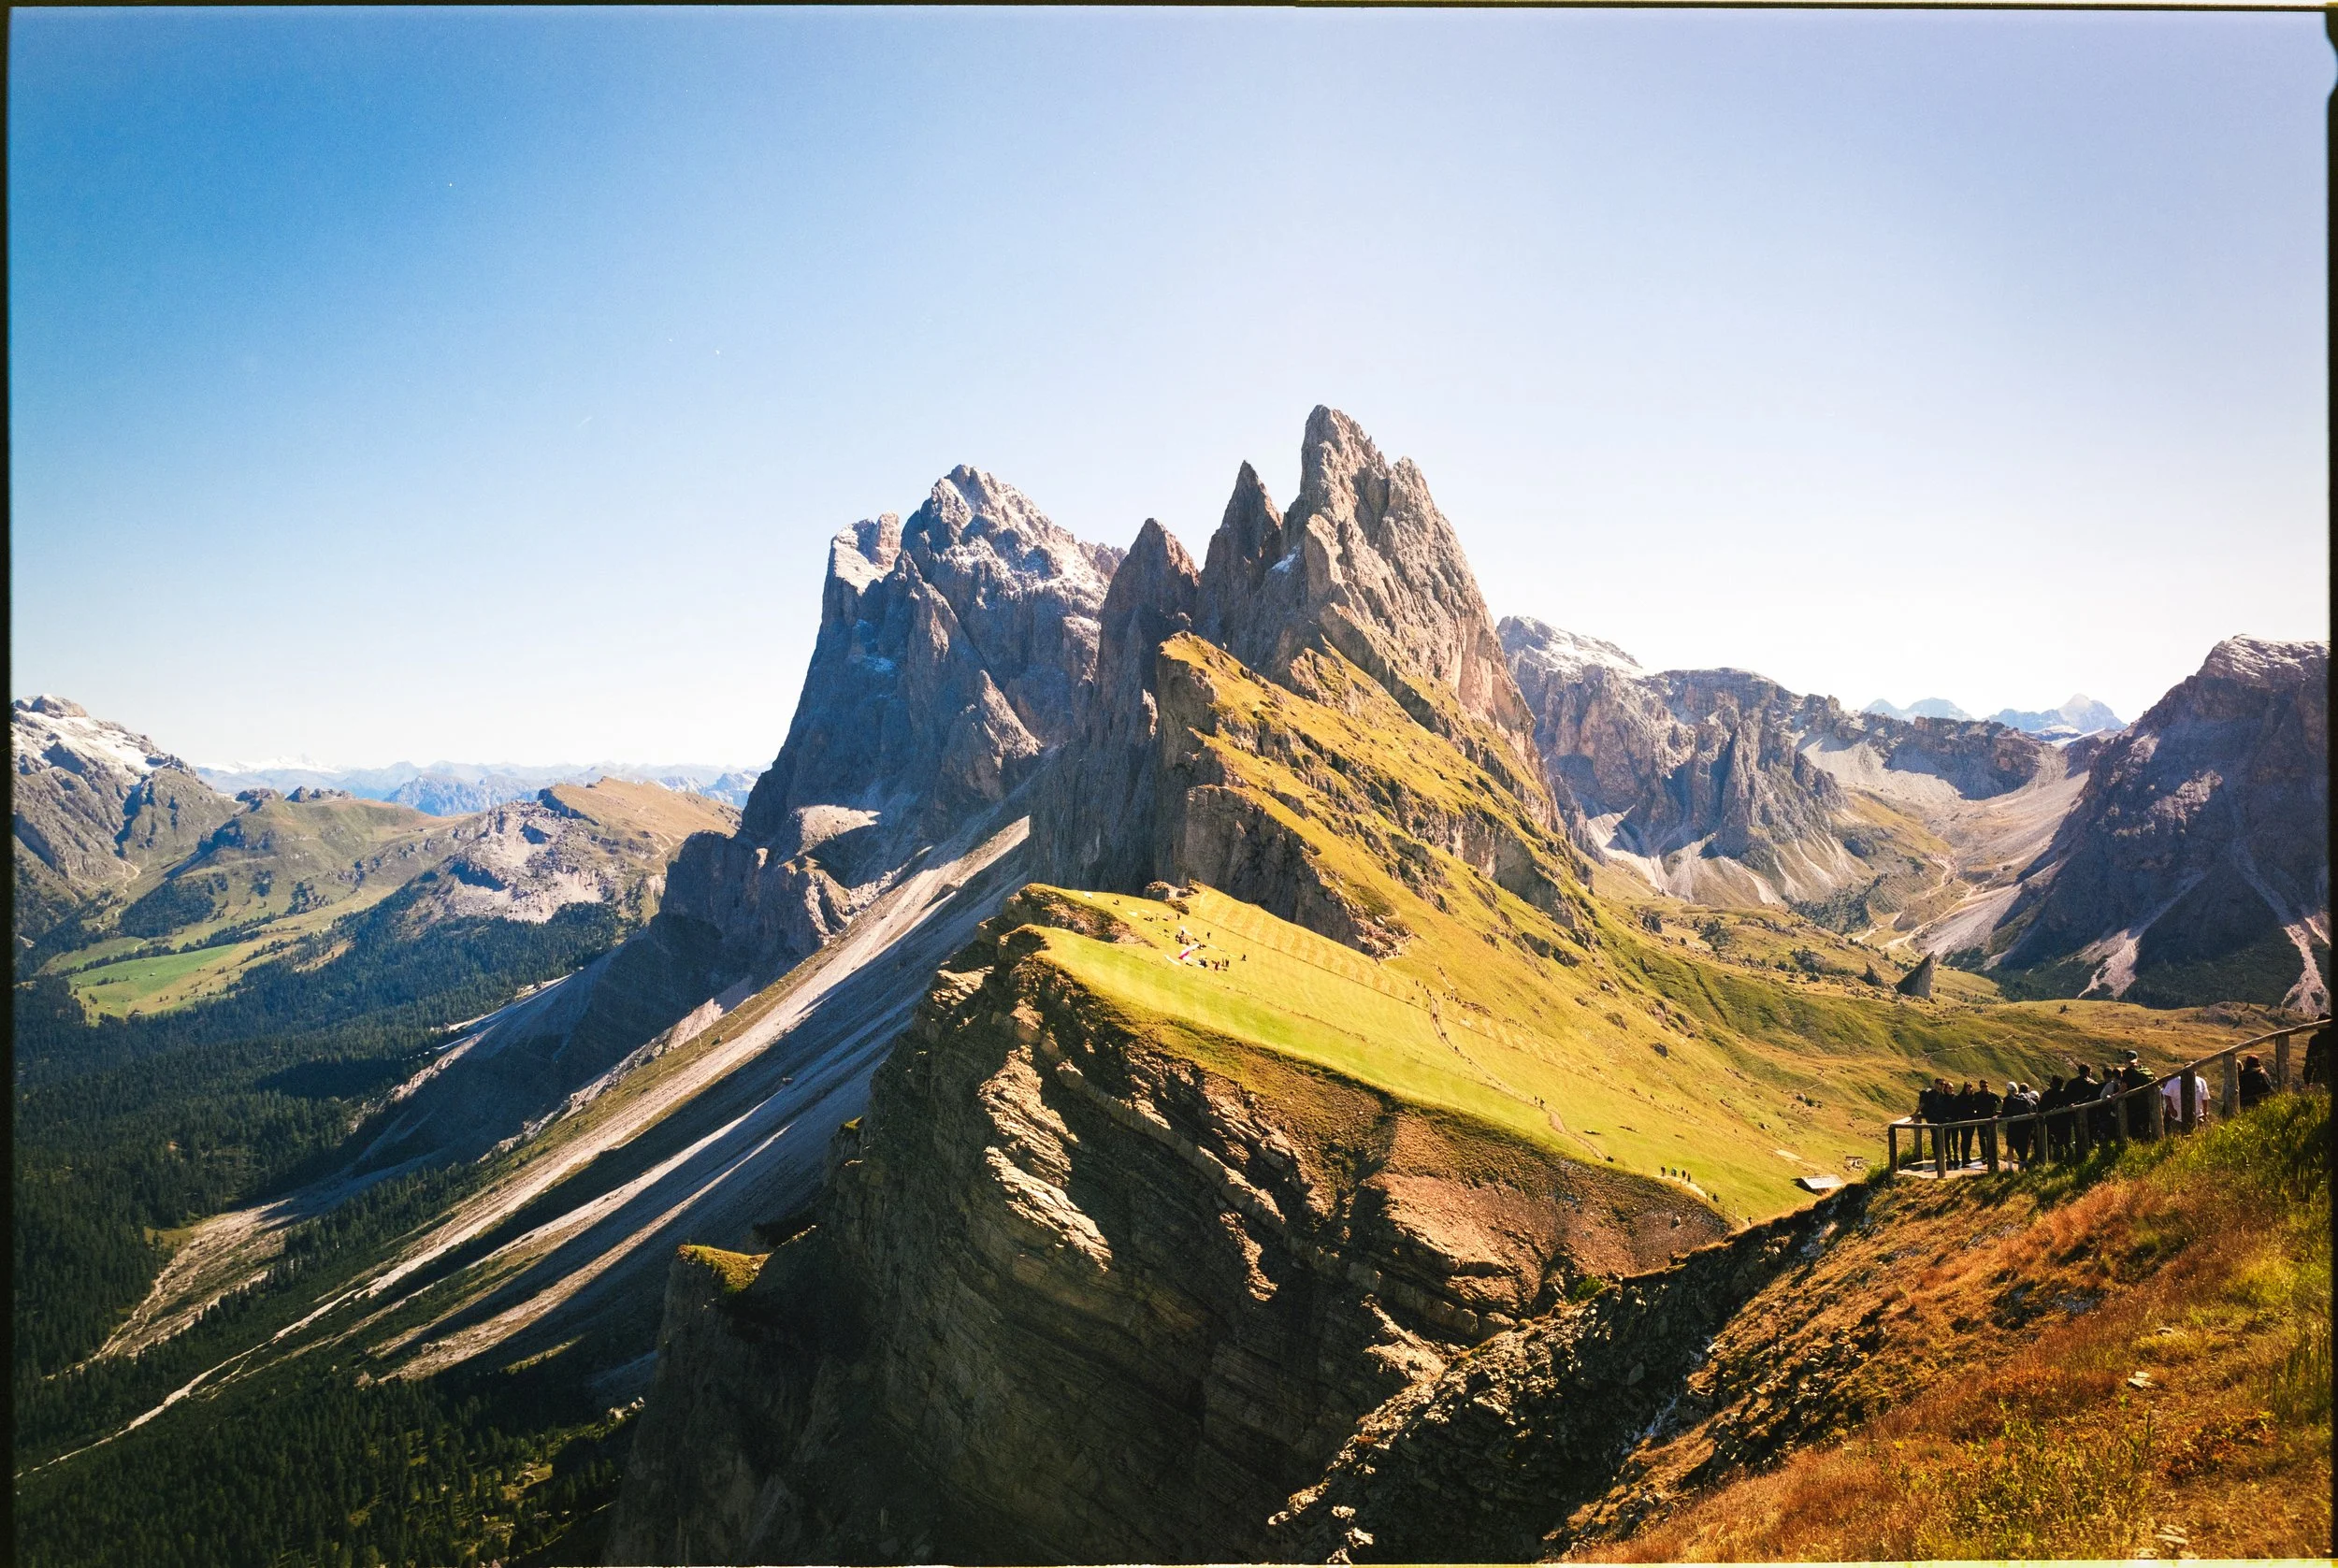
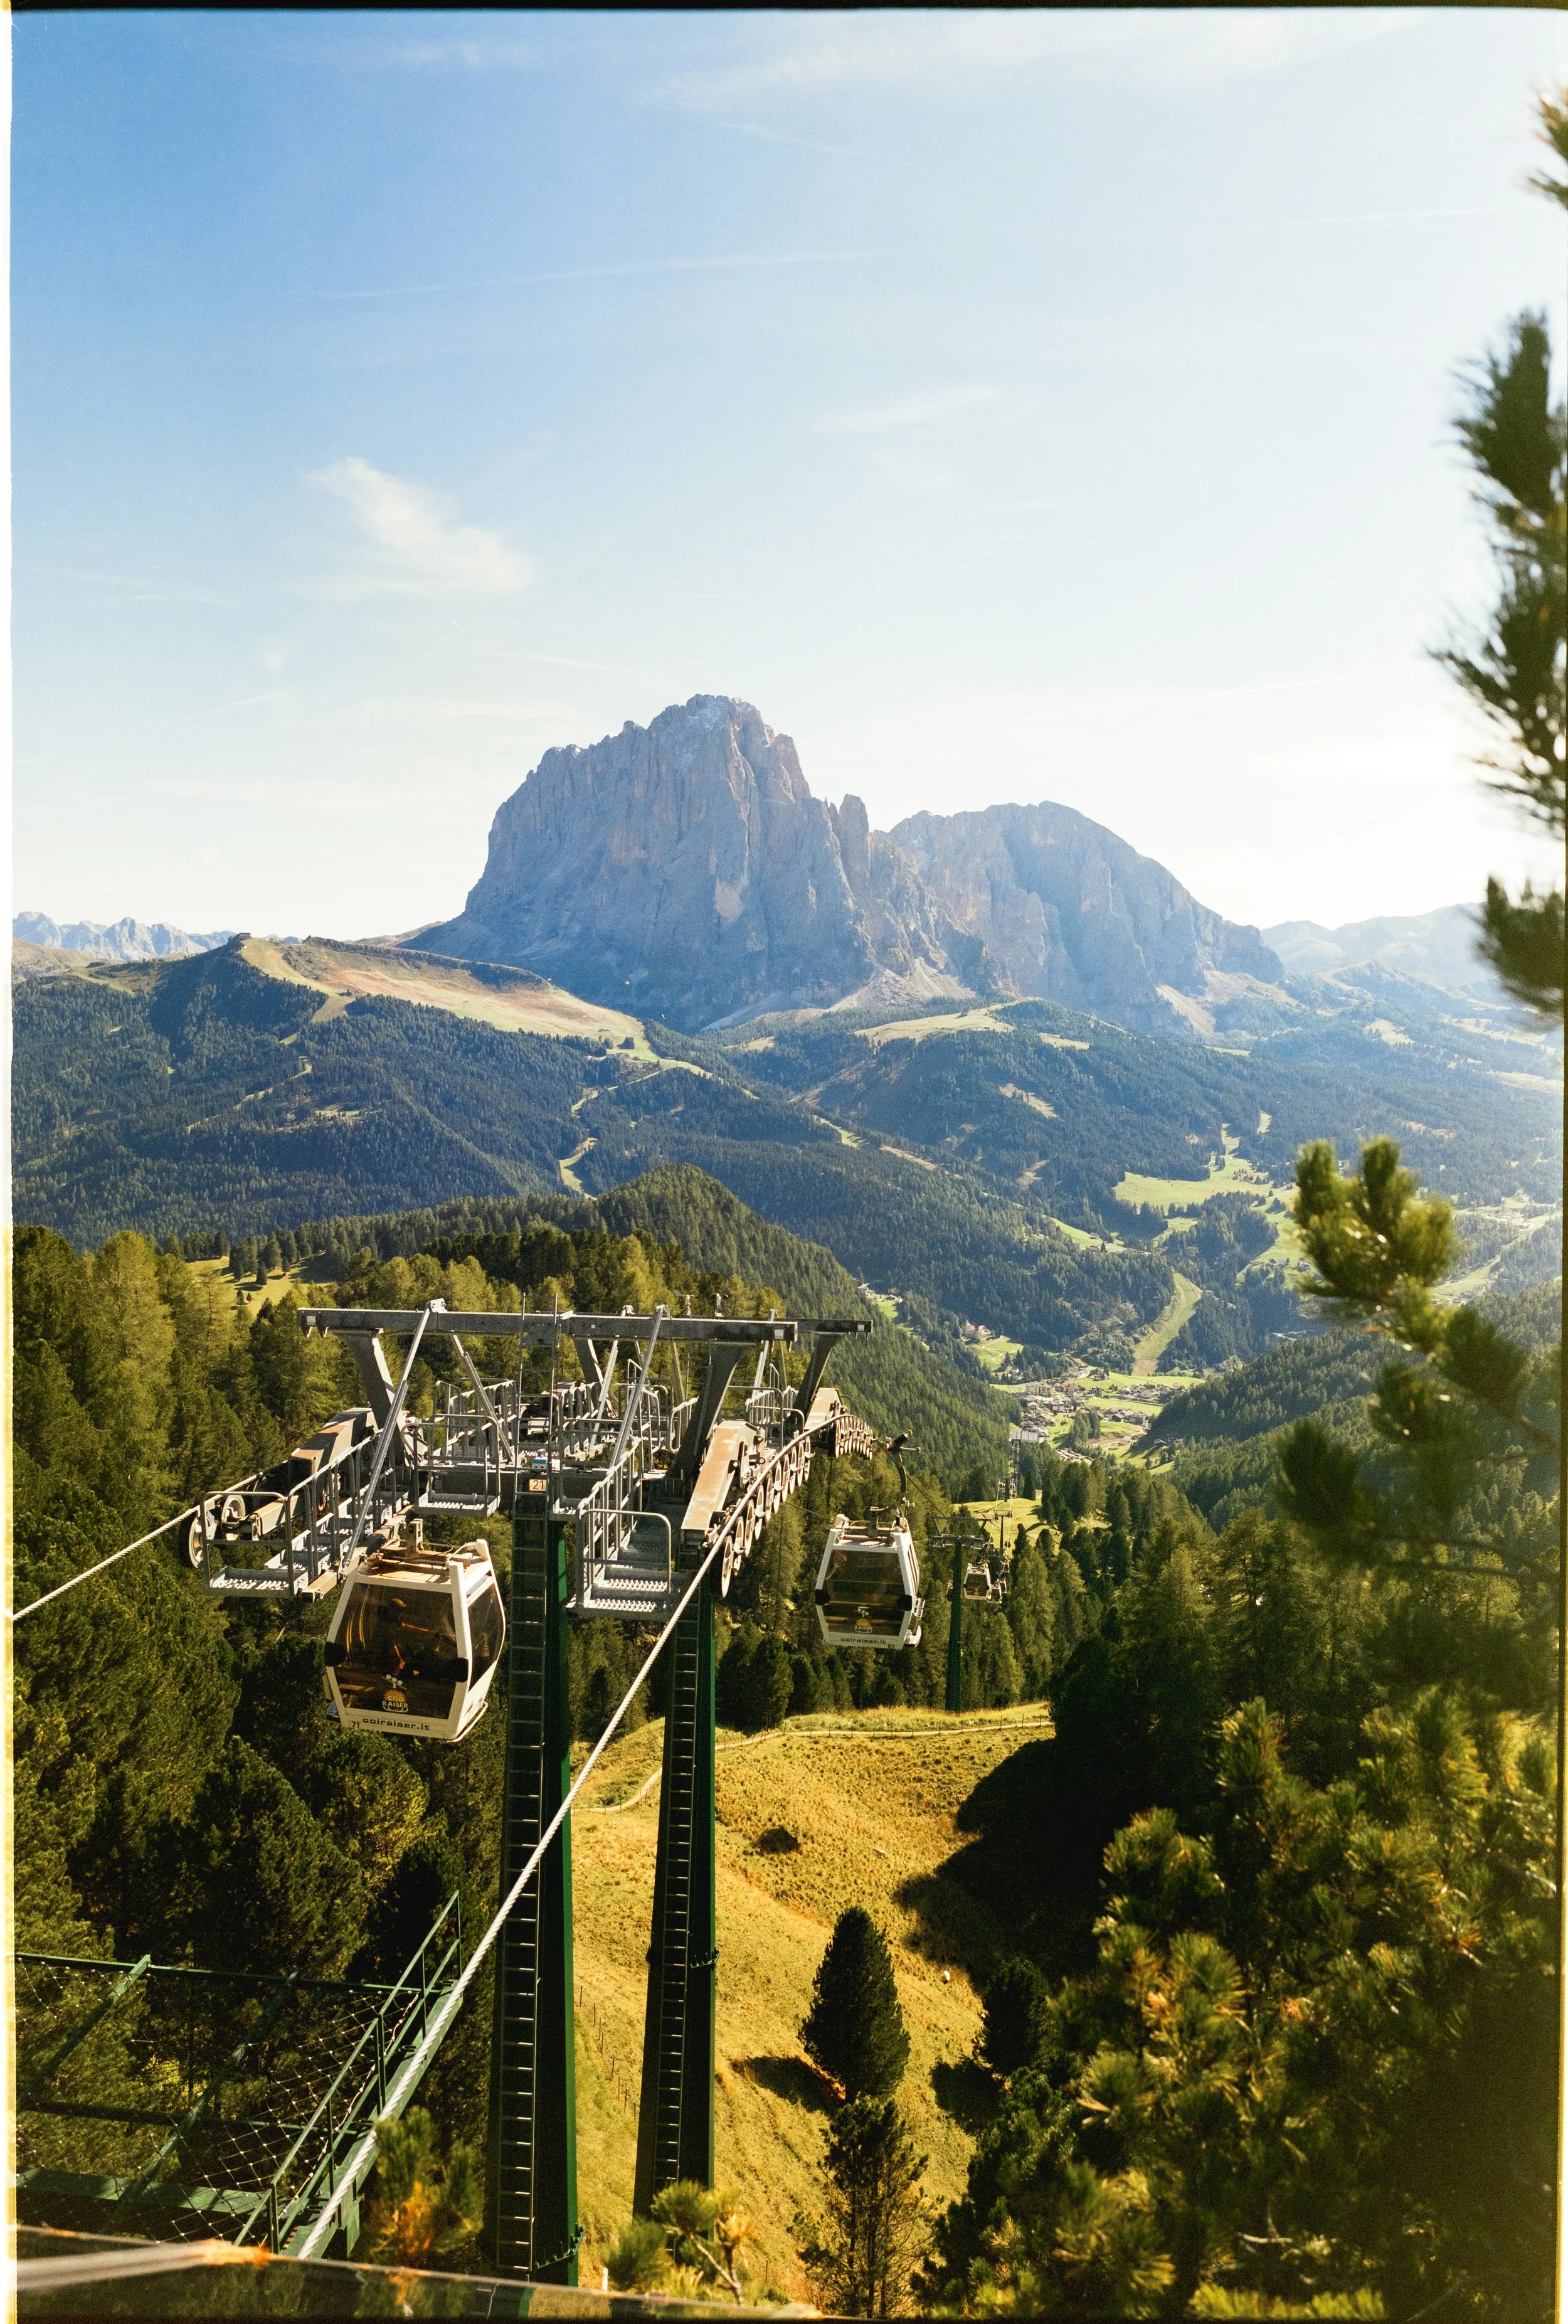
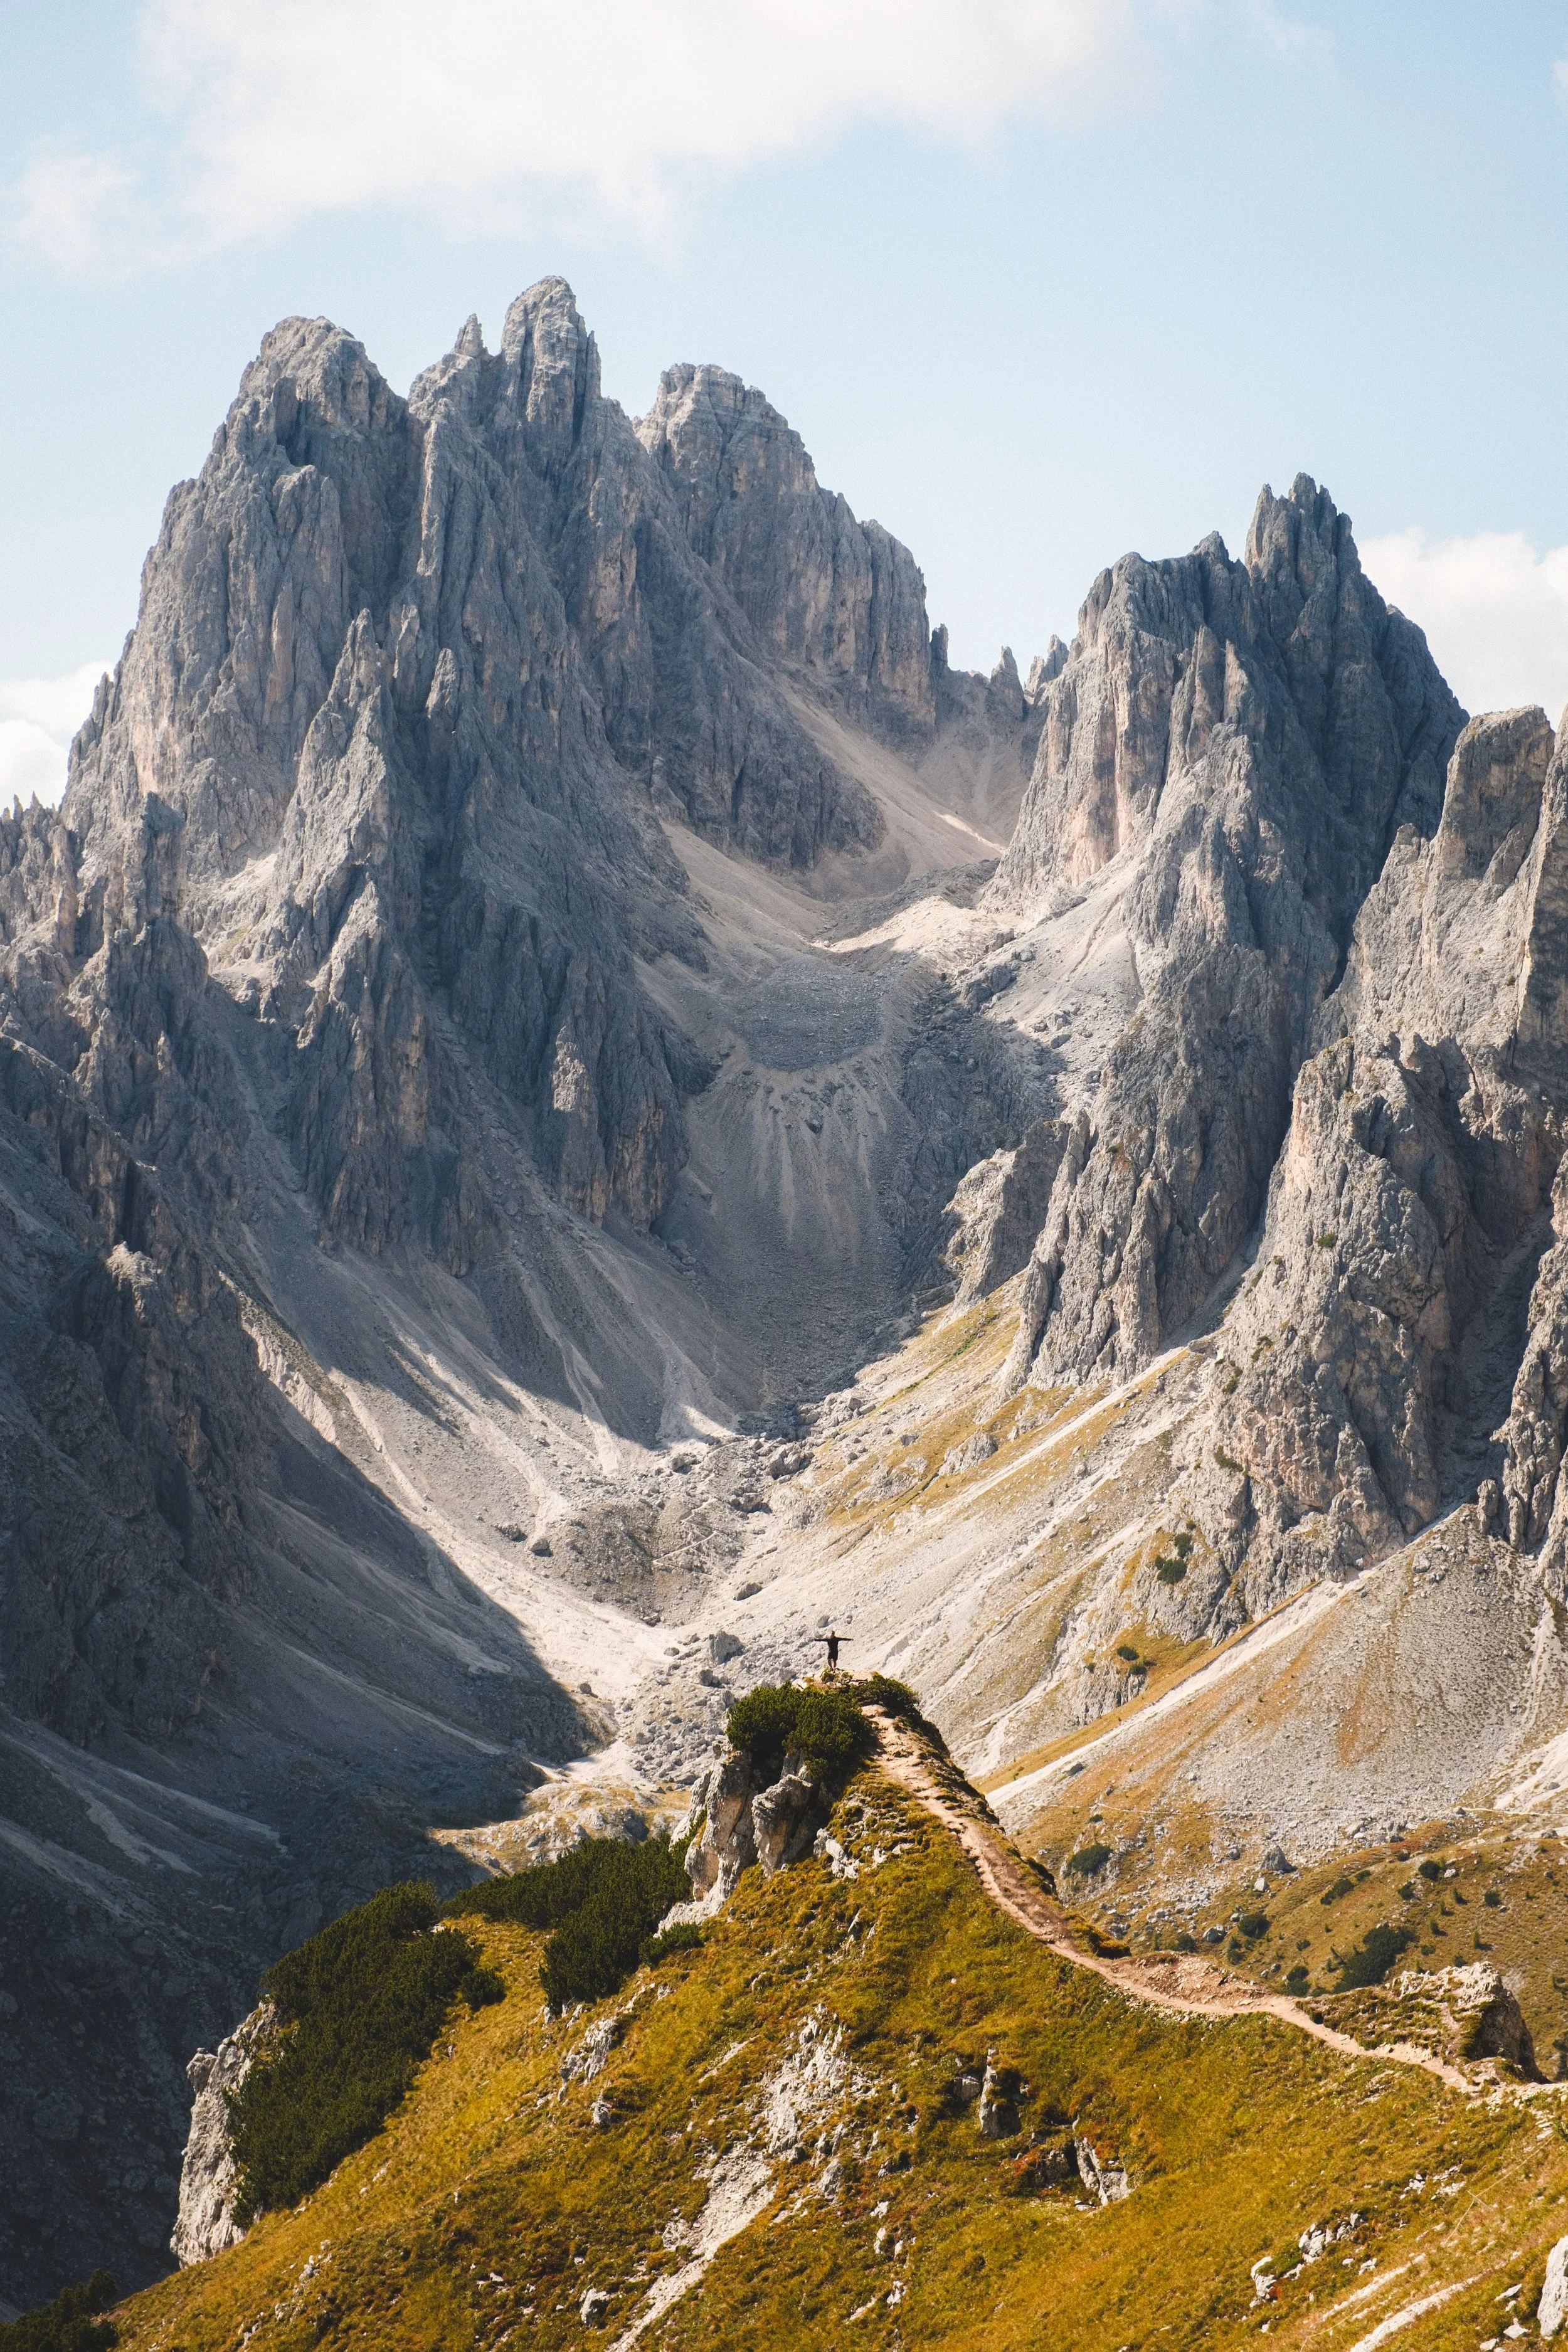
Seceda | Photography & Hiking Guide
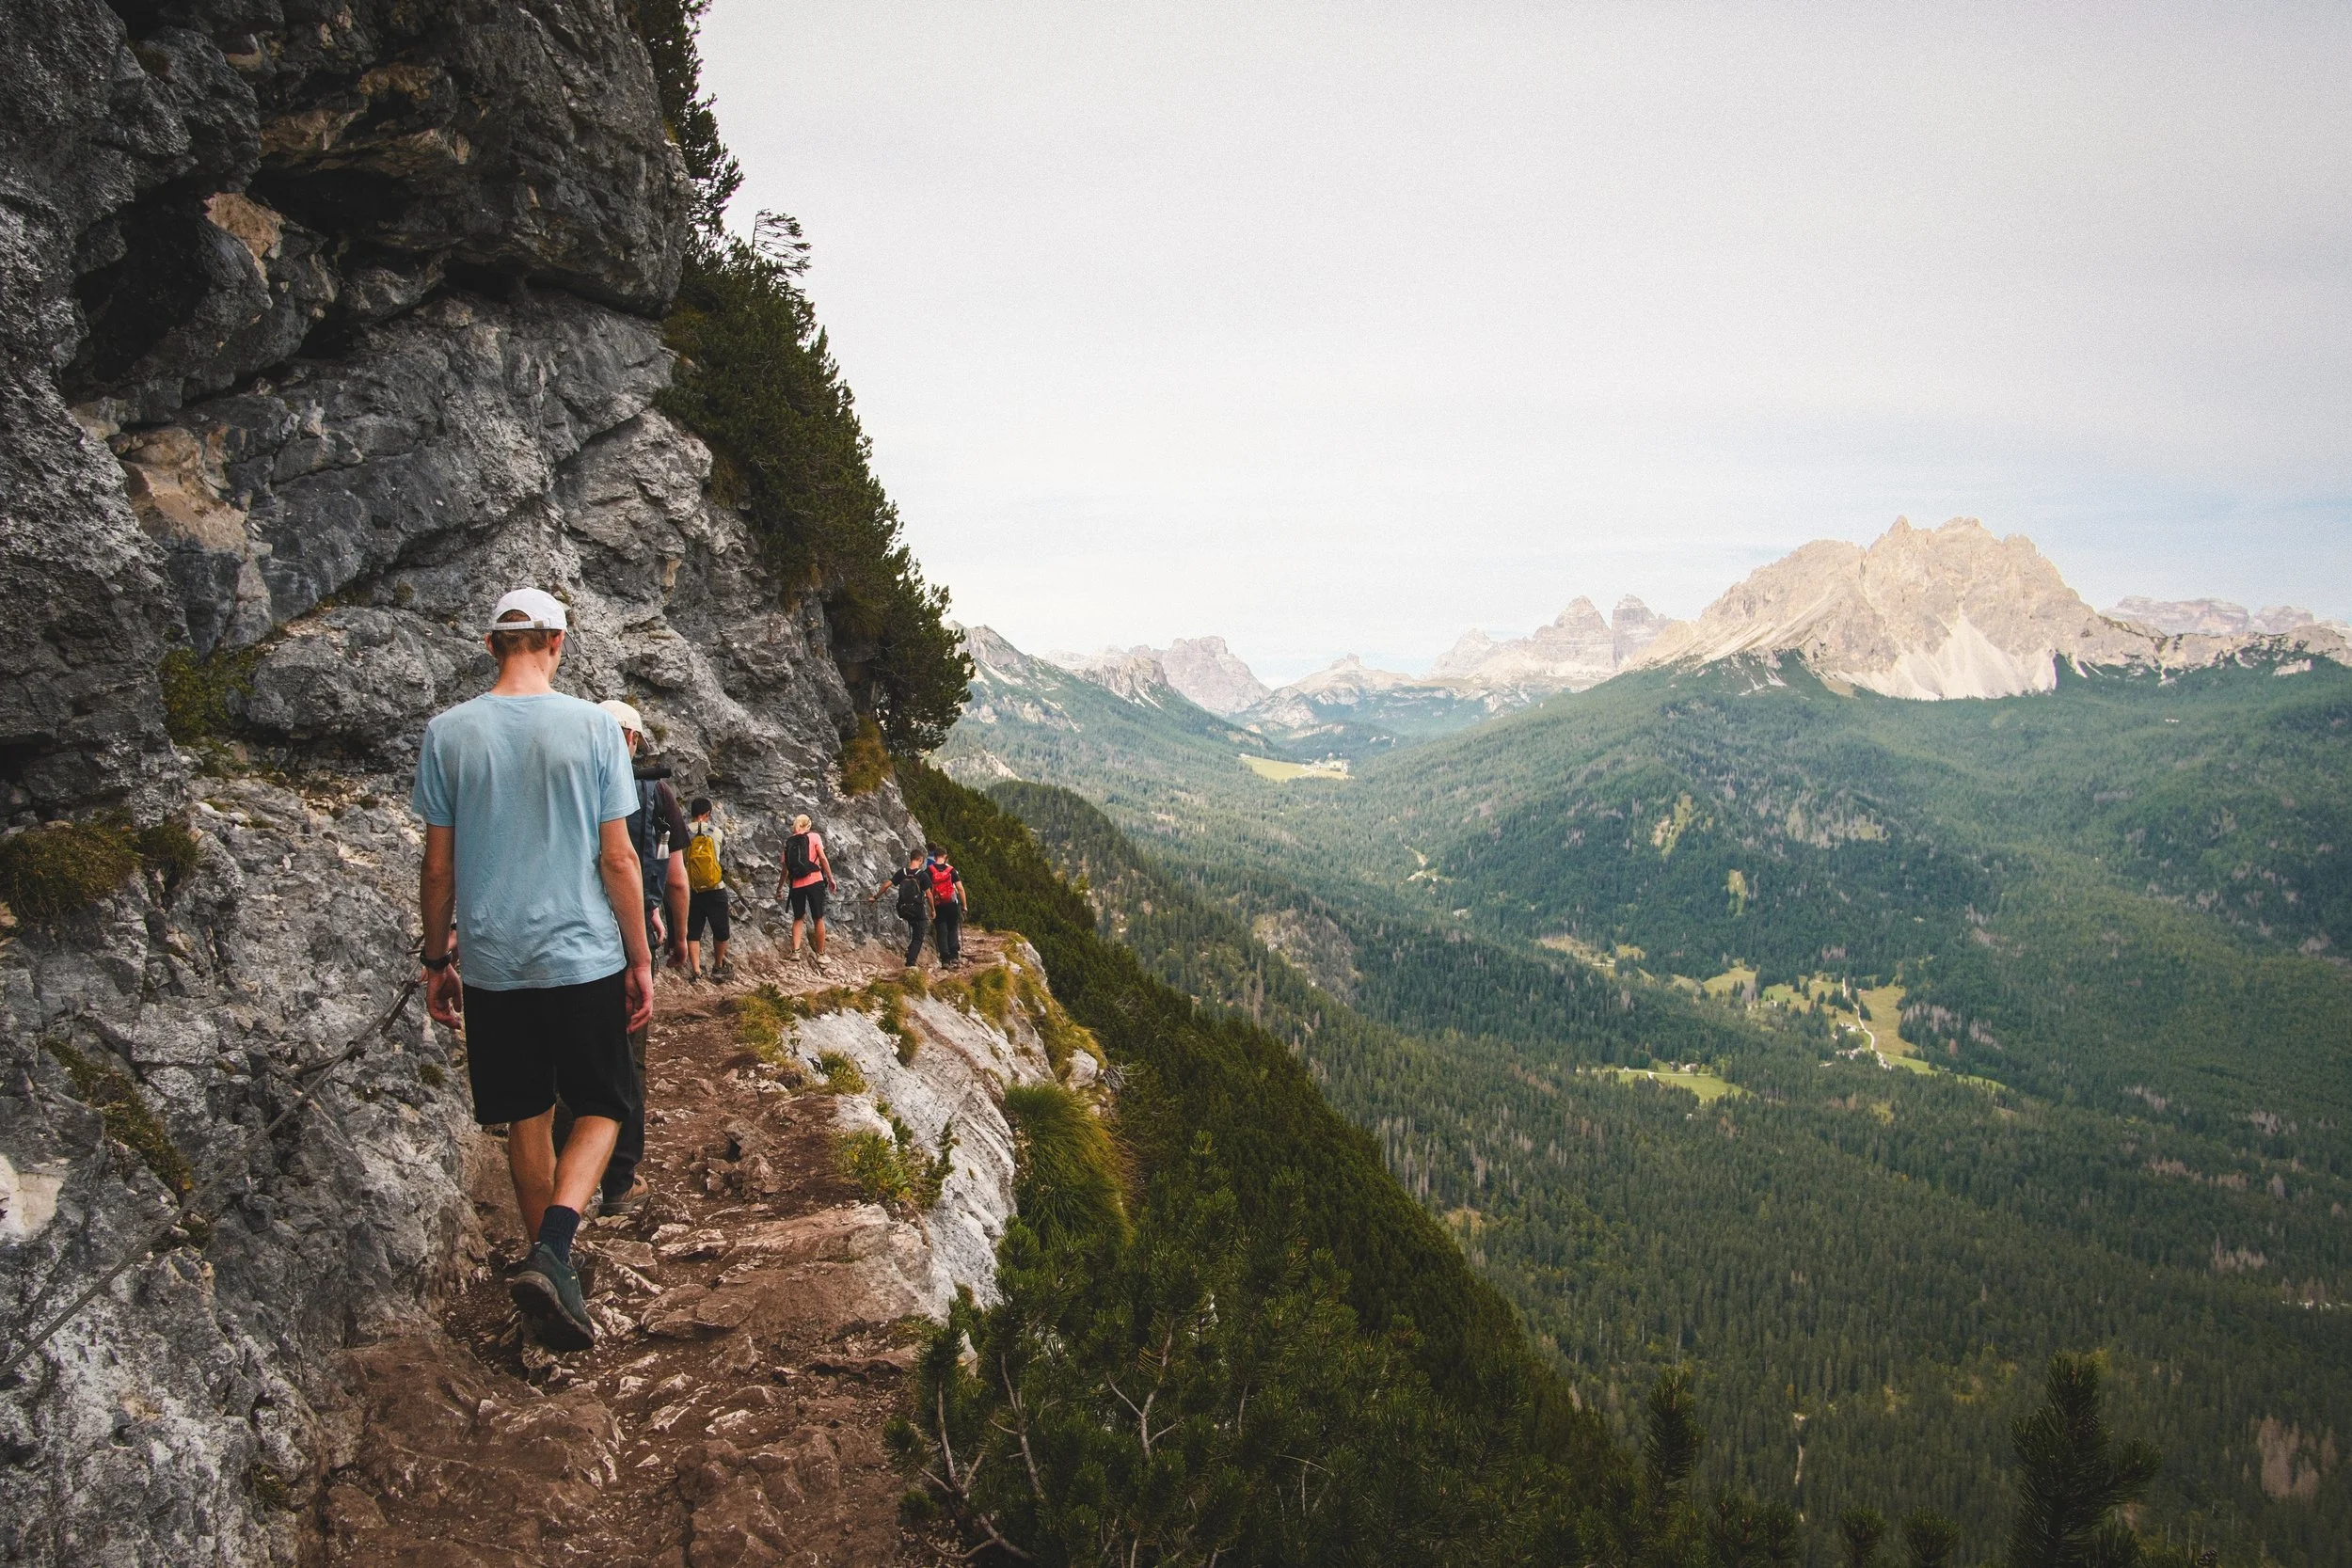
One of the most photographed ridgelines in the Dolomites, and it earns it. The view from the cliff edge, with the jagged Odle spires behind and the valleys dropping away below, is as good in person as every version of it you've already seen online.
The main viewpoint.
Fuji GSW 690 | Fujicolor Pro 400H
Getting there
Drive to Ortisei in Val Gardena and take the Col Raiser gondola, €34 return per person. It skips a long, unrewarding climb and drops you close enough that the walk to the viewpoint feels earned rather than exhausting. Well worth it.
The walk
From the top of Col Raiser, follow the trail up to the main viewpoint, the clifftop ridge with the Odle spires behind you and Val Gardena spread out below. This is the hero shot, and it's every bit as good as you'd hope. Two things to know before you go. The exact clifftop position used in the most iconic compositions is now fenced off for safety, so you'll shoot from nearby rather than the spot you've seen online. And a short stretch of ridge, around 500m, carries a €5 fee to pass through, which felt a little arbitrary on the day. You can walk around it, which I'd suggest unless you're short on time.
The Odle spires face the morning sun, so the light on the hero shot is best early. Take the first gondola and you get both the light and the ridge to yourself before the day crowds build.
Don't turn back at the viewpoint. The route down through the valleys is quieter, less photographed, and where Seceda surprised us most. The Langkofel massif dominates the view in the opposite direction to the Odles, and the afternoon light through the valley was some of the best we found anywhere on the trip. There's a rifugio at the bottom worth stopping at, with good food and a surprisingly photogenic terrace. One of my favourite frames from the whole trip was looking back down the cable car from the top station, with the Langkofel looming behind it.
Practical notes
Take the first gondola if you can. The ridge gets busy and the early light is better.
Walk the second leg rather than taking the Fermeda chairlift. It isn't long, and arriving on foot makes the viewpoint more rewarding.
The famous clifftop composition is now fenced off. Good shots are still possible, just not from the exact spot.
A €5 fee applies to a short ridge section, easily avoided by taking the path around it.
The circular route back through the valleys is far quieter than the main ridge path.
Verdict: One of the best days of the trip. Go.
View of Langkofel from the top of the first cable car.
Fuji GSW 690 | Fujicolor Pro 400H
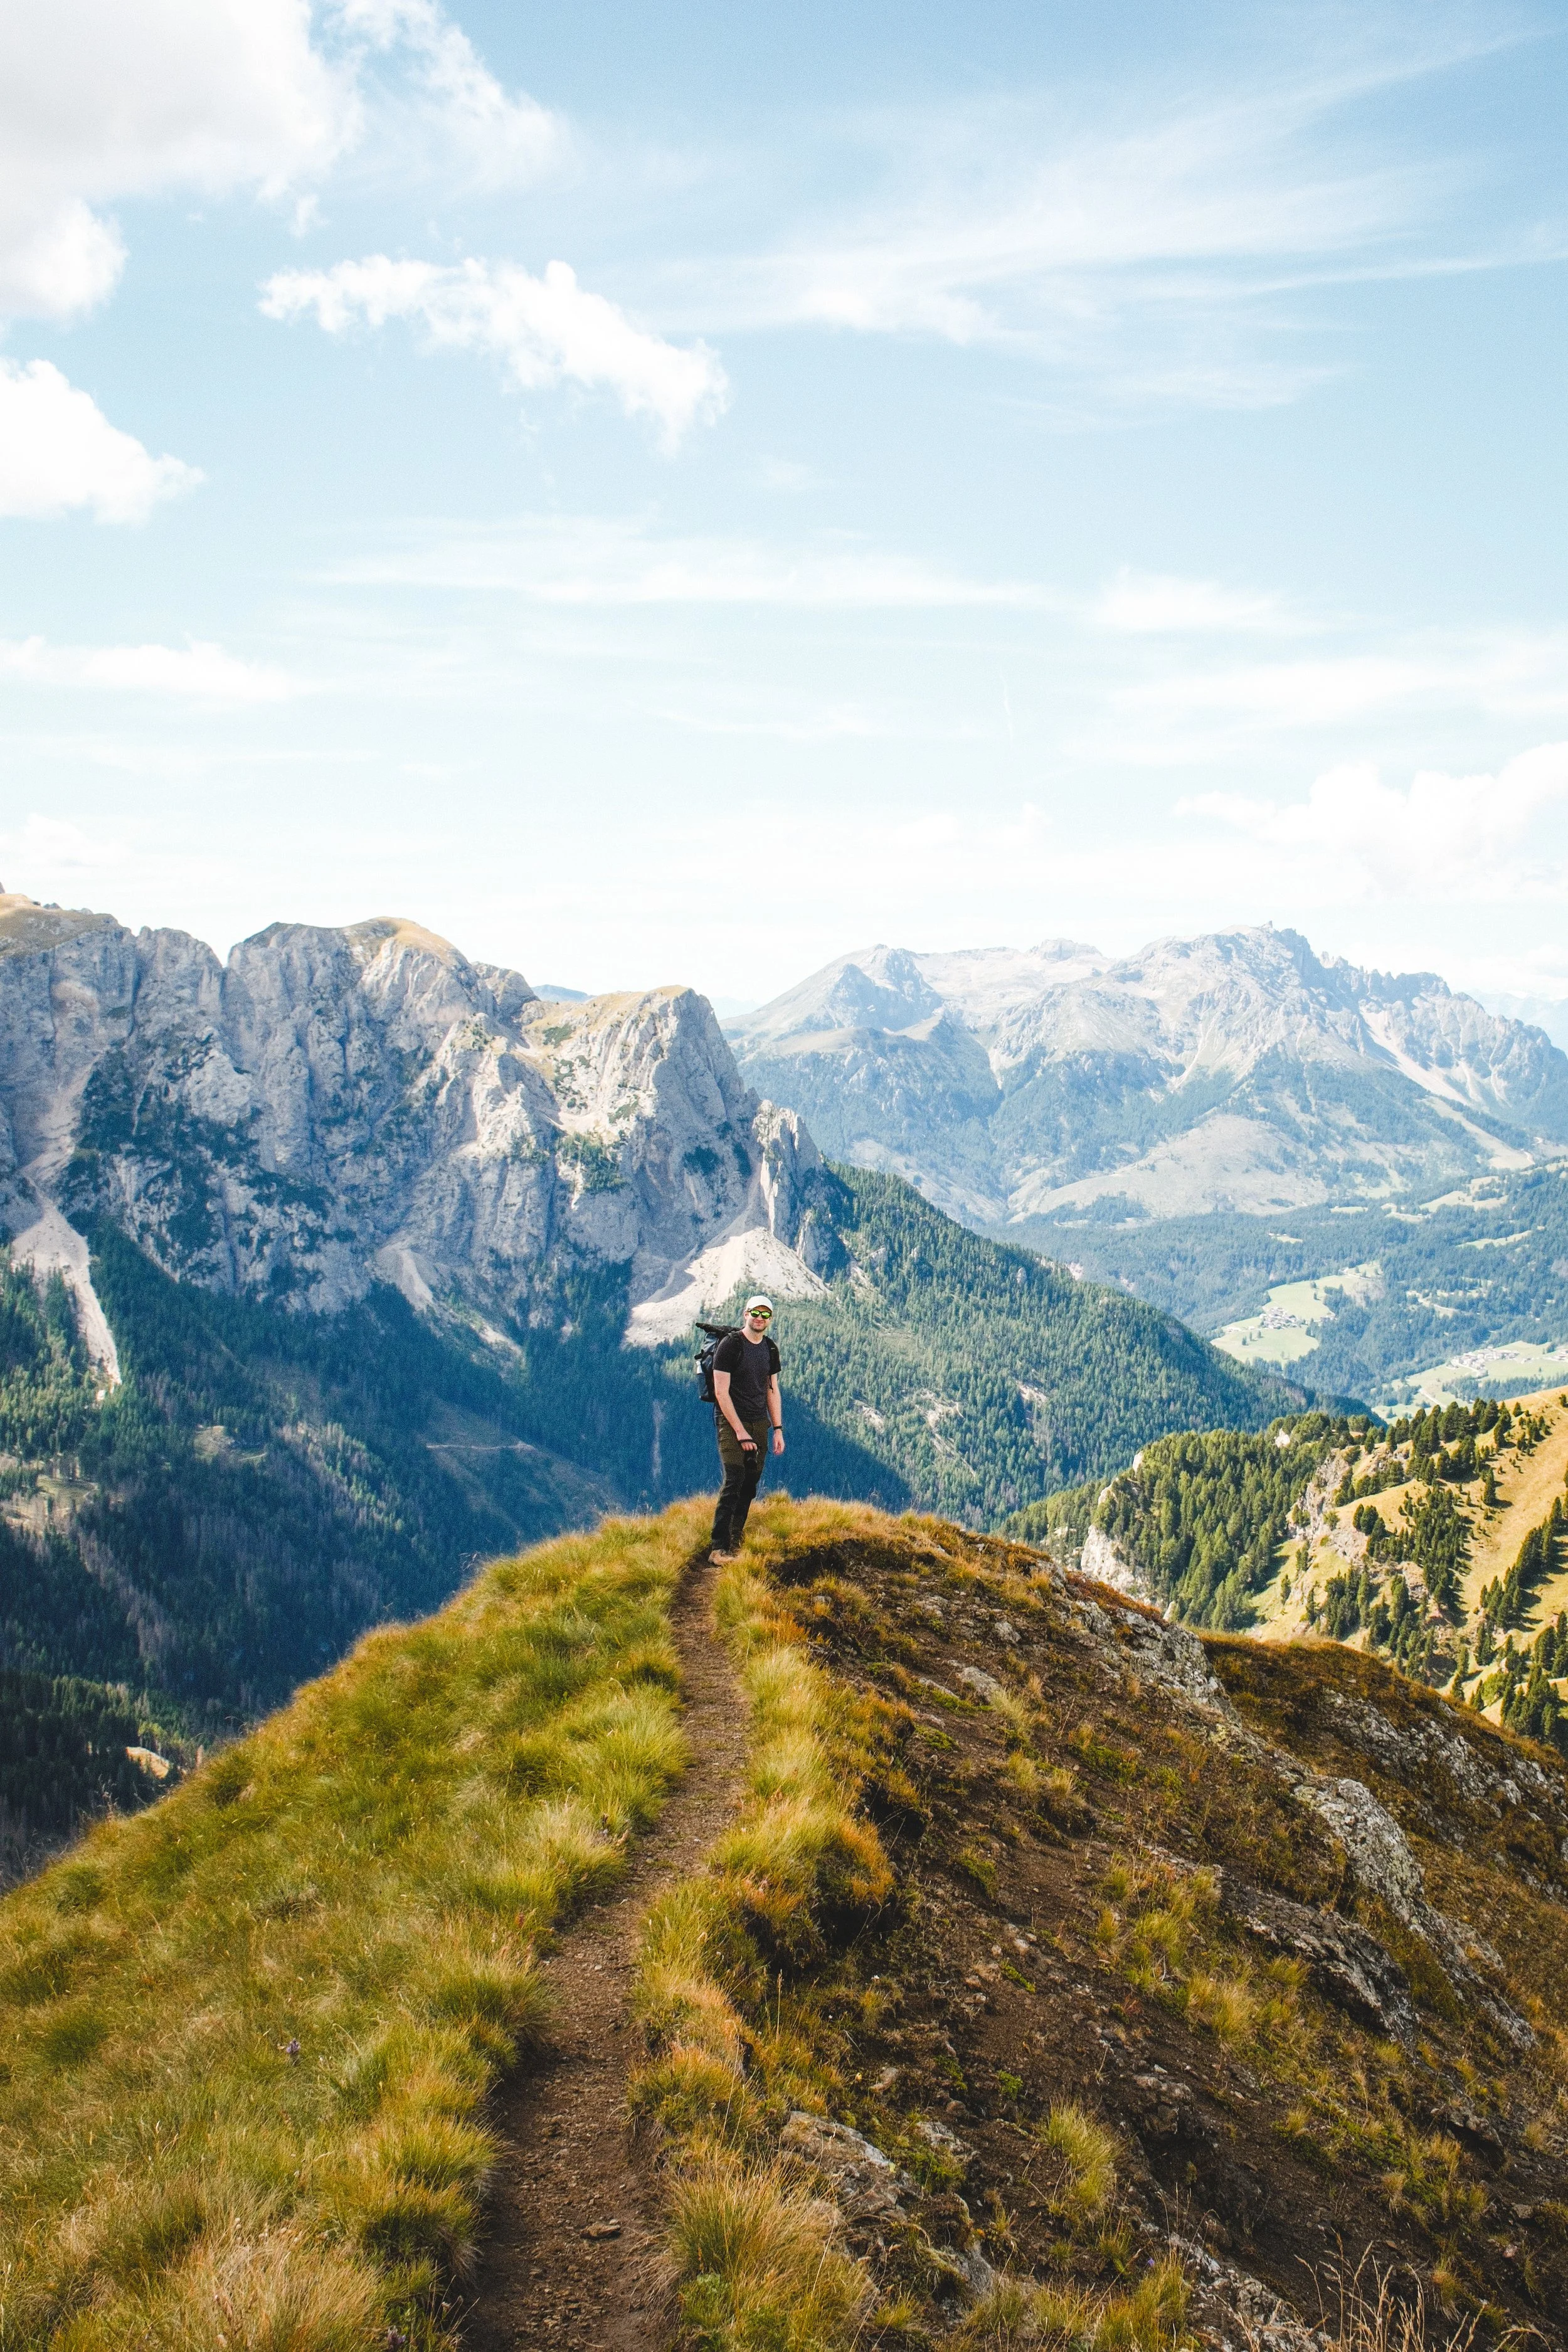
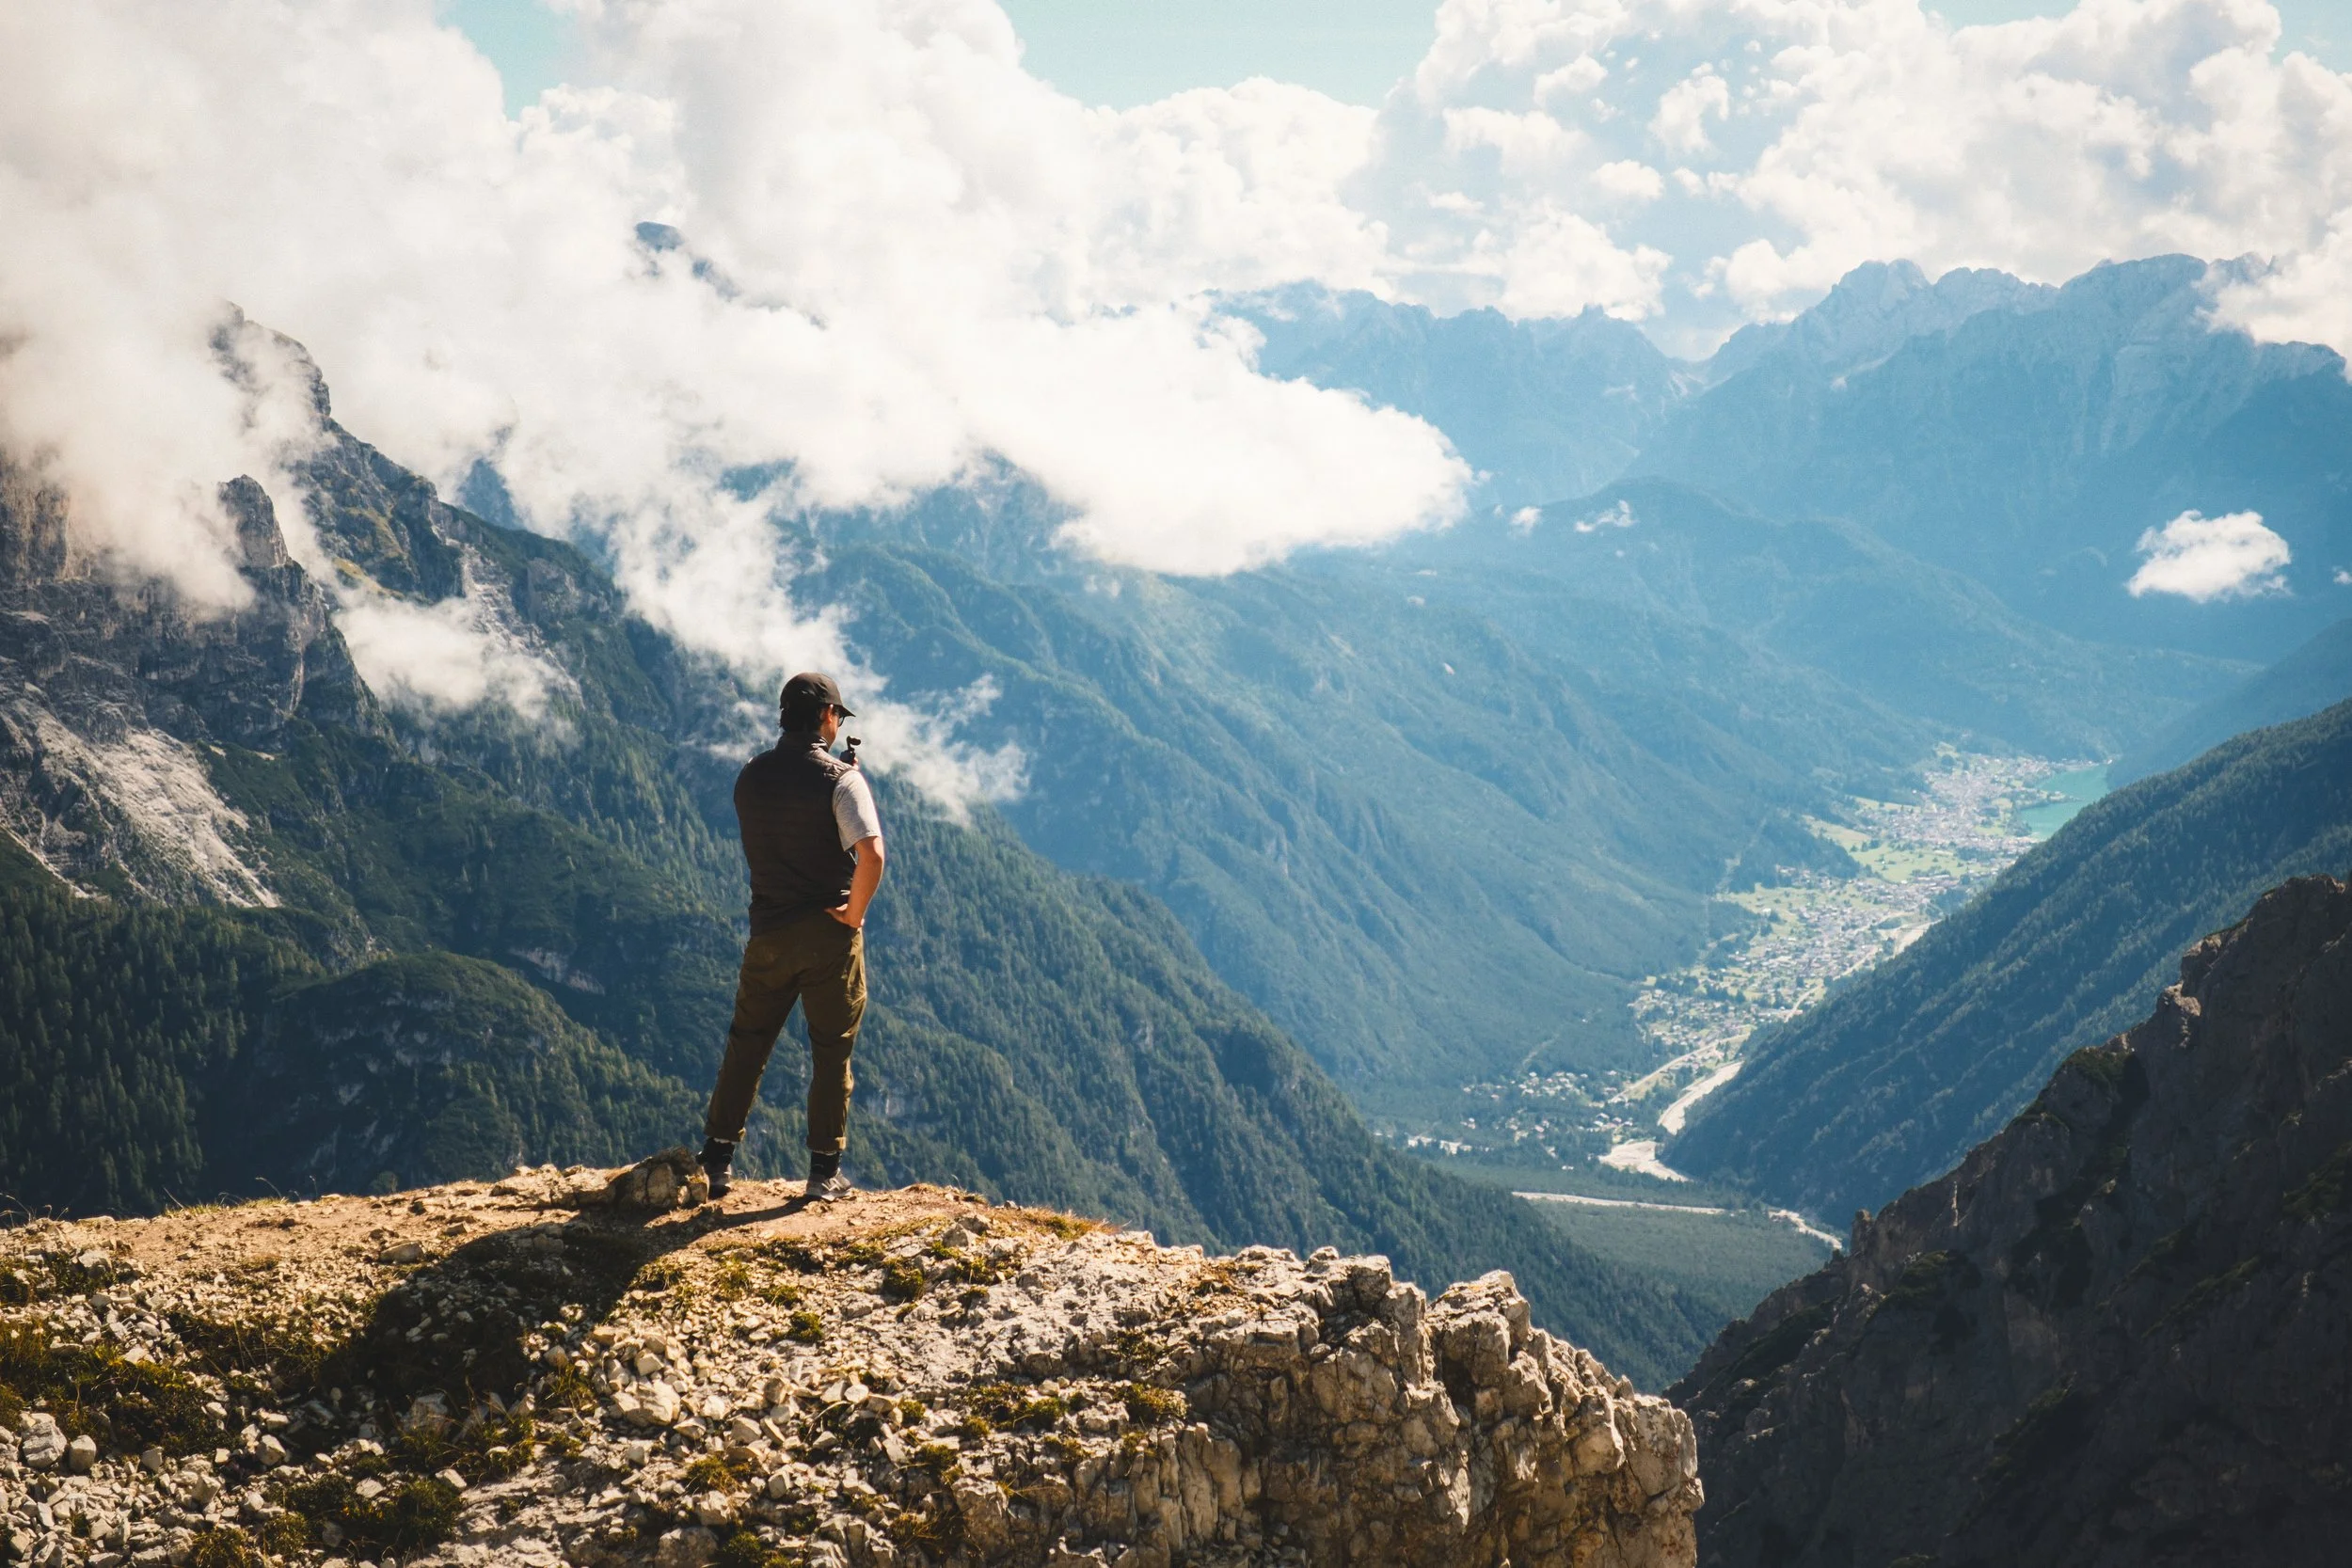
Piz Boè & Passo Pordoi
If Seceda is the Dolomites at their most elegant, Piz Boè is the Dolomites at their most severe. The landscape up here is vast, pale and almost without vegetation, a high plateau of limestone running towards a 3,152m summit, and it feels unlike anywhere else in the range.
View of Langkofel from the top of the cable car.
Fuji GSW 690 | Kodak Ektar 100
Getting there
Park at Passo Pordoi and take the Sass Pordoi cable car, €32 return per person. The car park fills early, but don't panic if it's full, because we found free roadside parking a little further along without much trouble. The cable car is worth the ride for the views alone.
The walk
From the top, the path to Piz Boè is clear and well-marked, though you'll still want your phone for navigation. It isn't long in distance, but the altitude makes it tiring, and on a clear September day the heat adds up on top of the thin air above 3,000m. Give it a full day rather than rushing.
The ascent gets scrambly and steep near the summit, which is part of the appeal, and there's a real sense of achievement at the top. The return route loops around the other side, easier underfoot and giving you more chance to look at the landscape rather than your feet. You pass a small lake on the way back, a welcome surprise in otherwise barren terrain.
One thing to be realistic about: Piz Boè is harder to photograph than it is to experience. The scale works against you, and it's difficult to convey in a frame just how vast the plateau is. Don't come primarily for the photography. Come because the hiking is extraordinary and the sense of place is unlike anything else in the Dolomites.
Photography
The best shot of the day wasn't from the summit but from the top of the cable car, looking across at the Langkofel from a completely different angle to Seceda. Take your time here before pushing on. The canyons and rock valleys below are striking but genuinely hard to capture, one of those places where you end up putting the camera down and just looking.
Practical notes
Passo Pordoi car park fills early. Roadside parking nearby is free and perfectly usable.
Allow a full day. The altitude makes it more tiring than the distance suggests.
The return loop is easier than the ascent and passes a small lake, so don't skip it.
The path is clear, but bring navigation on your phone.
Verdict: Not the easiest location to photograph, but one of the most memorable days of the trip. The scale and strangeness of the landscape at this altitude carries it on its own terms.

The baron landscape around Piz Boè
Fujifilm X-T5 | Reala Ace Film Simulation
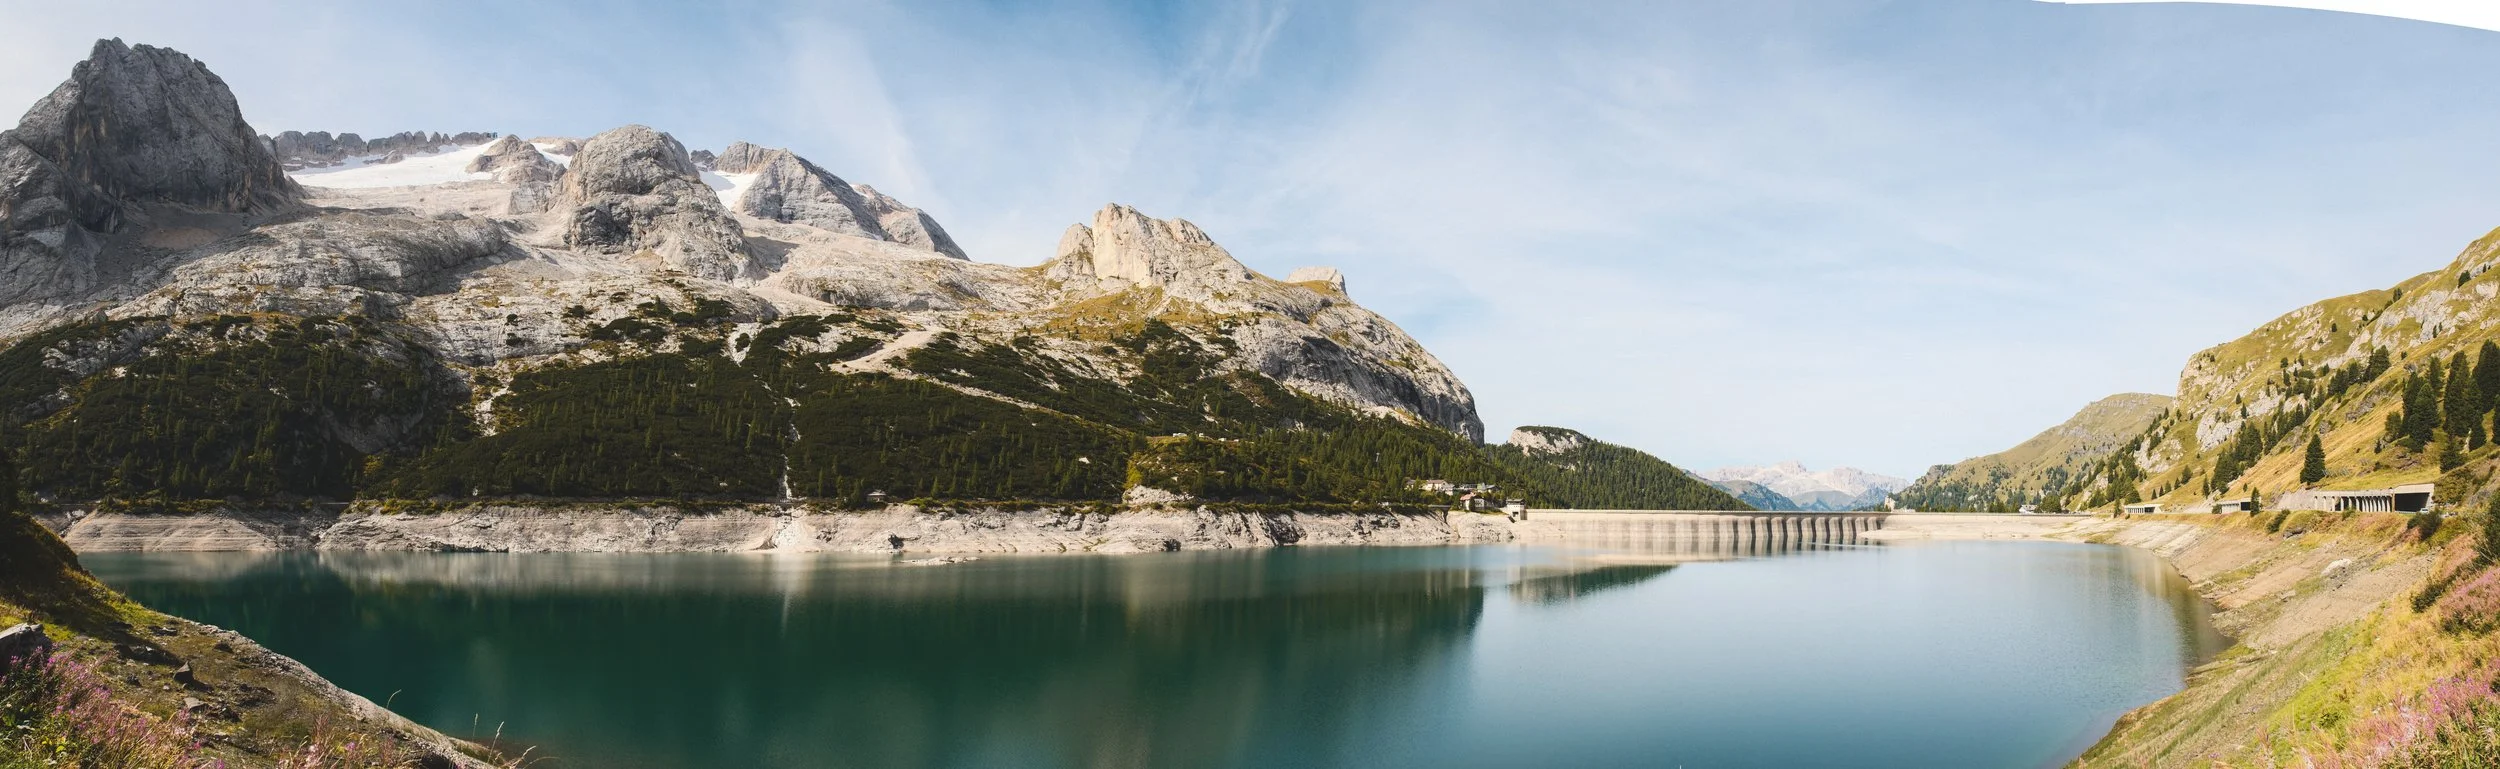
Lago di Fedaia
The closest major location to Penia, and one of the most rewarding stops of the whole trip. It's visually spectacular, and it hides an almost entirely unmarked WWI frontline on the hillside above the lake.
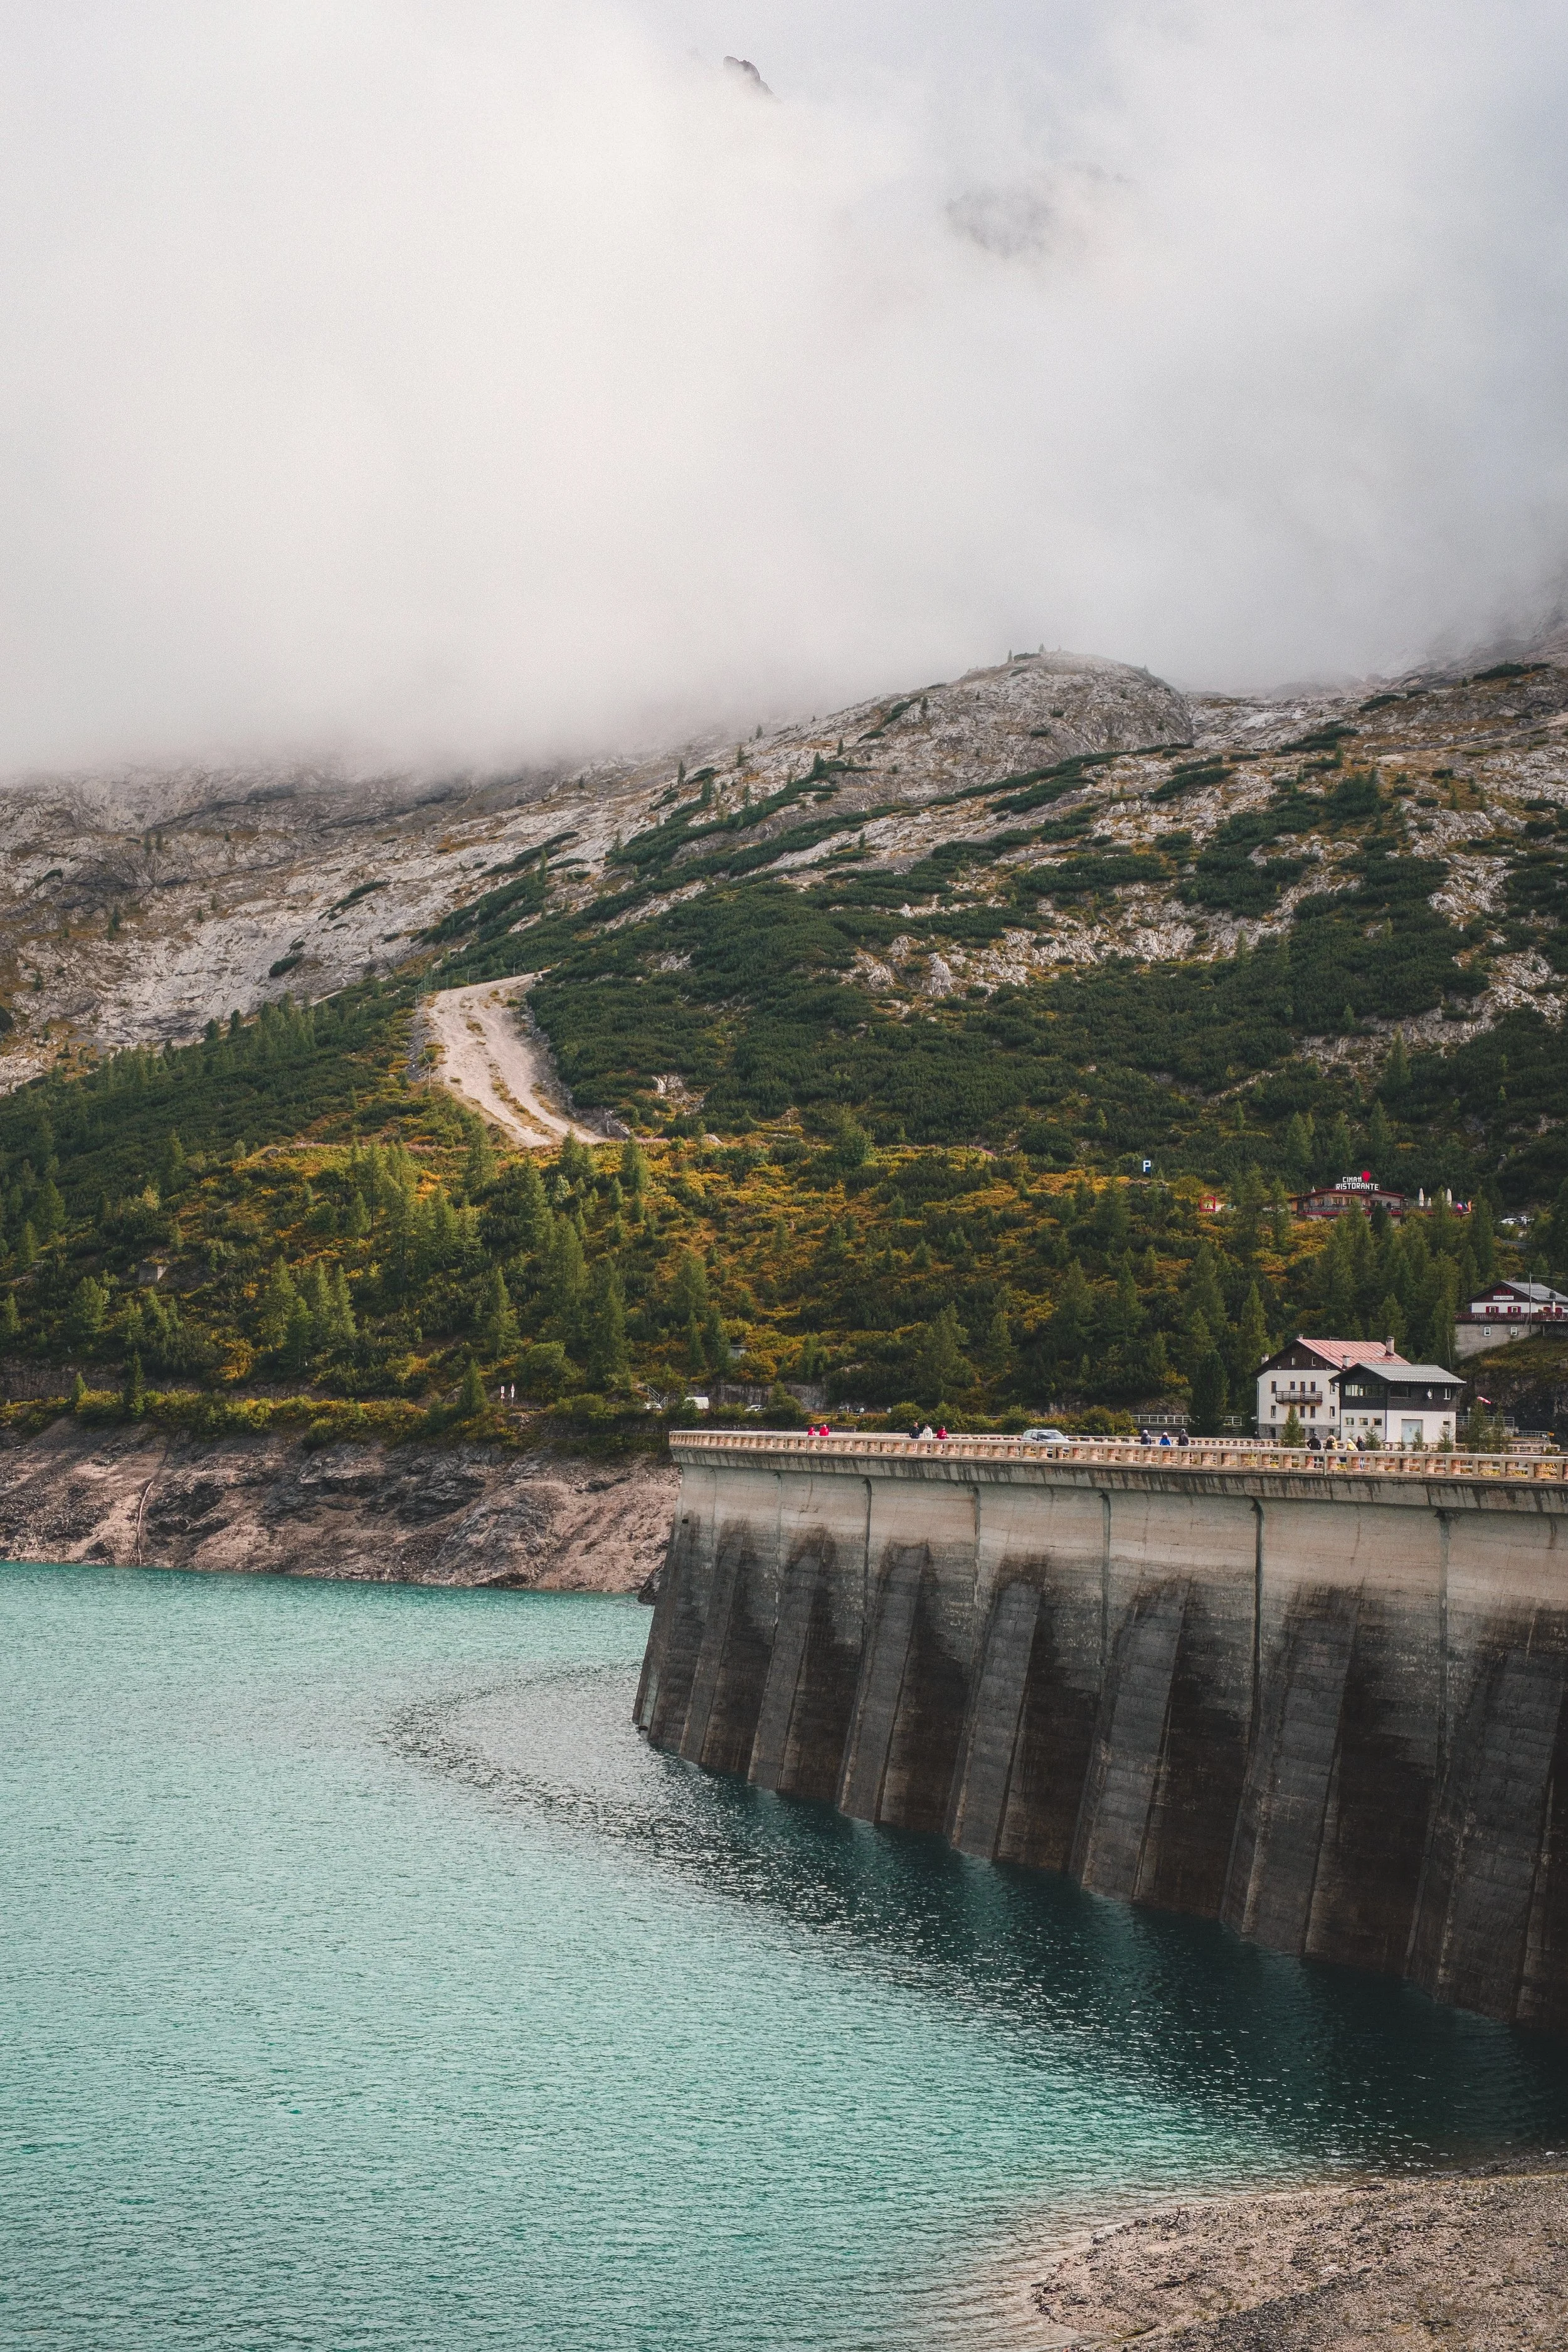
Fedaia Dam
Fujifilm X-T5 | Reala Ace Film Simulation
Getting there
It's right on the doorstep of Penia, a short drive with free roadside parking. Walk across the dam from the main road, or take the path around the lake edge.
The walk
After crossing the dam, we scrambled up the mountainside above it. There's no formal trail and the path disappears fairly quickly, so this is more of an adventure than a structured hike. What makes it special is what you find up there. The whole hillside was a WWI frontline, and once you start looking you see it everywhere: trenches cut into the rock, old field kitchens, and we even came across an underground tunnel. The history is remarkable and almost entirely unmarked, so you're discovering it as you go. The views back down over the dam and the full lake from above are excellent.
Photography
The lake is best shot wide. The vivid water colour, the geometry of the dam, and the mountain behind make a classic panoramic frame that works beautifully on an ultrawide screen. The elevated position above the dam gives you an angle down over the full scene that you can't get from the shoreline.
Practical notes
Free roadside parking, short walk to the dam.
The scramble above the dam has no formal path, so go with a sense of adventure rather than expecting waymarkers.
Read up on the WWI Dolomites front before visiting. The history adds a lot to what you find up there.
Verdict: Not the most famous spot on the list, but excellent for panoramic photography and surprising for the history. A great half day from Penia.
Cabinovia Alba-Ciampac
The cable car that leaves directly from Penia, and easy to overlook in favour of the more famous locations nearby. Don't. Combined with the Sasso di Rocca chairlift at the top, it puts you on a dramatic ridgeline with sweeping views south, and once you're up there you have a menu of ridge walks to choose from depending on your energy and ambition.
Getting there
The cable car departs from Penia itself, so no driving required. At €25 return for the cable car and chairlift combined, it's the best-value uplift of the trip.
The walk
Plan for around three to four hours, though the real appeal is the flexibility. The ridge opens up in several directions once you're up there, so you can pick your route by how you're feeling rather than committing to a fixed plan. Both the cable car and chairlift sections are steep, but the reward is immediate, and the southern panorama is some of the finest scenery of the whole first week.
Photography
The ridgeline compositions here are exceptional, with steep drops on both sides and a vast southern horizon. One of my favourite frames of the trip came from here: a single peak receding into the distance, the kind of shot that only appears once you stop chasing the obvious foreground and look further out.
Practical notes
Departs from Penia, no car needed.
€25 return covers both the cable car and the Sasso di Rocca chairlift.
Flexible route options once you're on the ridge, so it suits any fitness level.
Verdict: The most underrated location of the first week. Quiet, dramatic, and right on the doorstep.
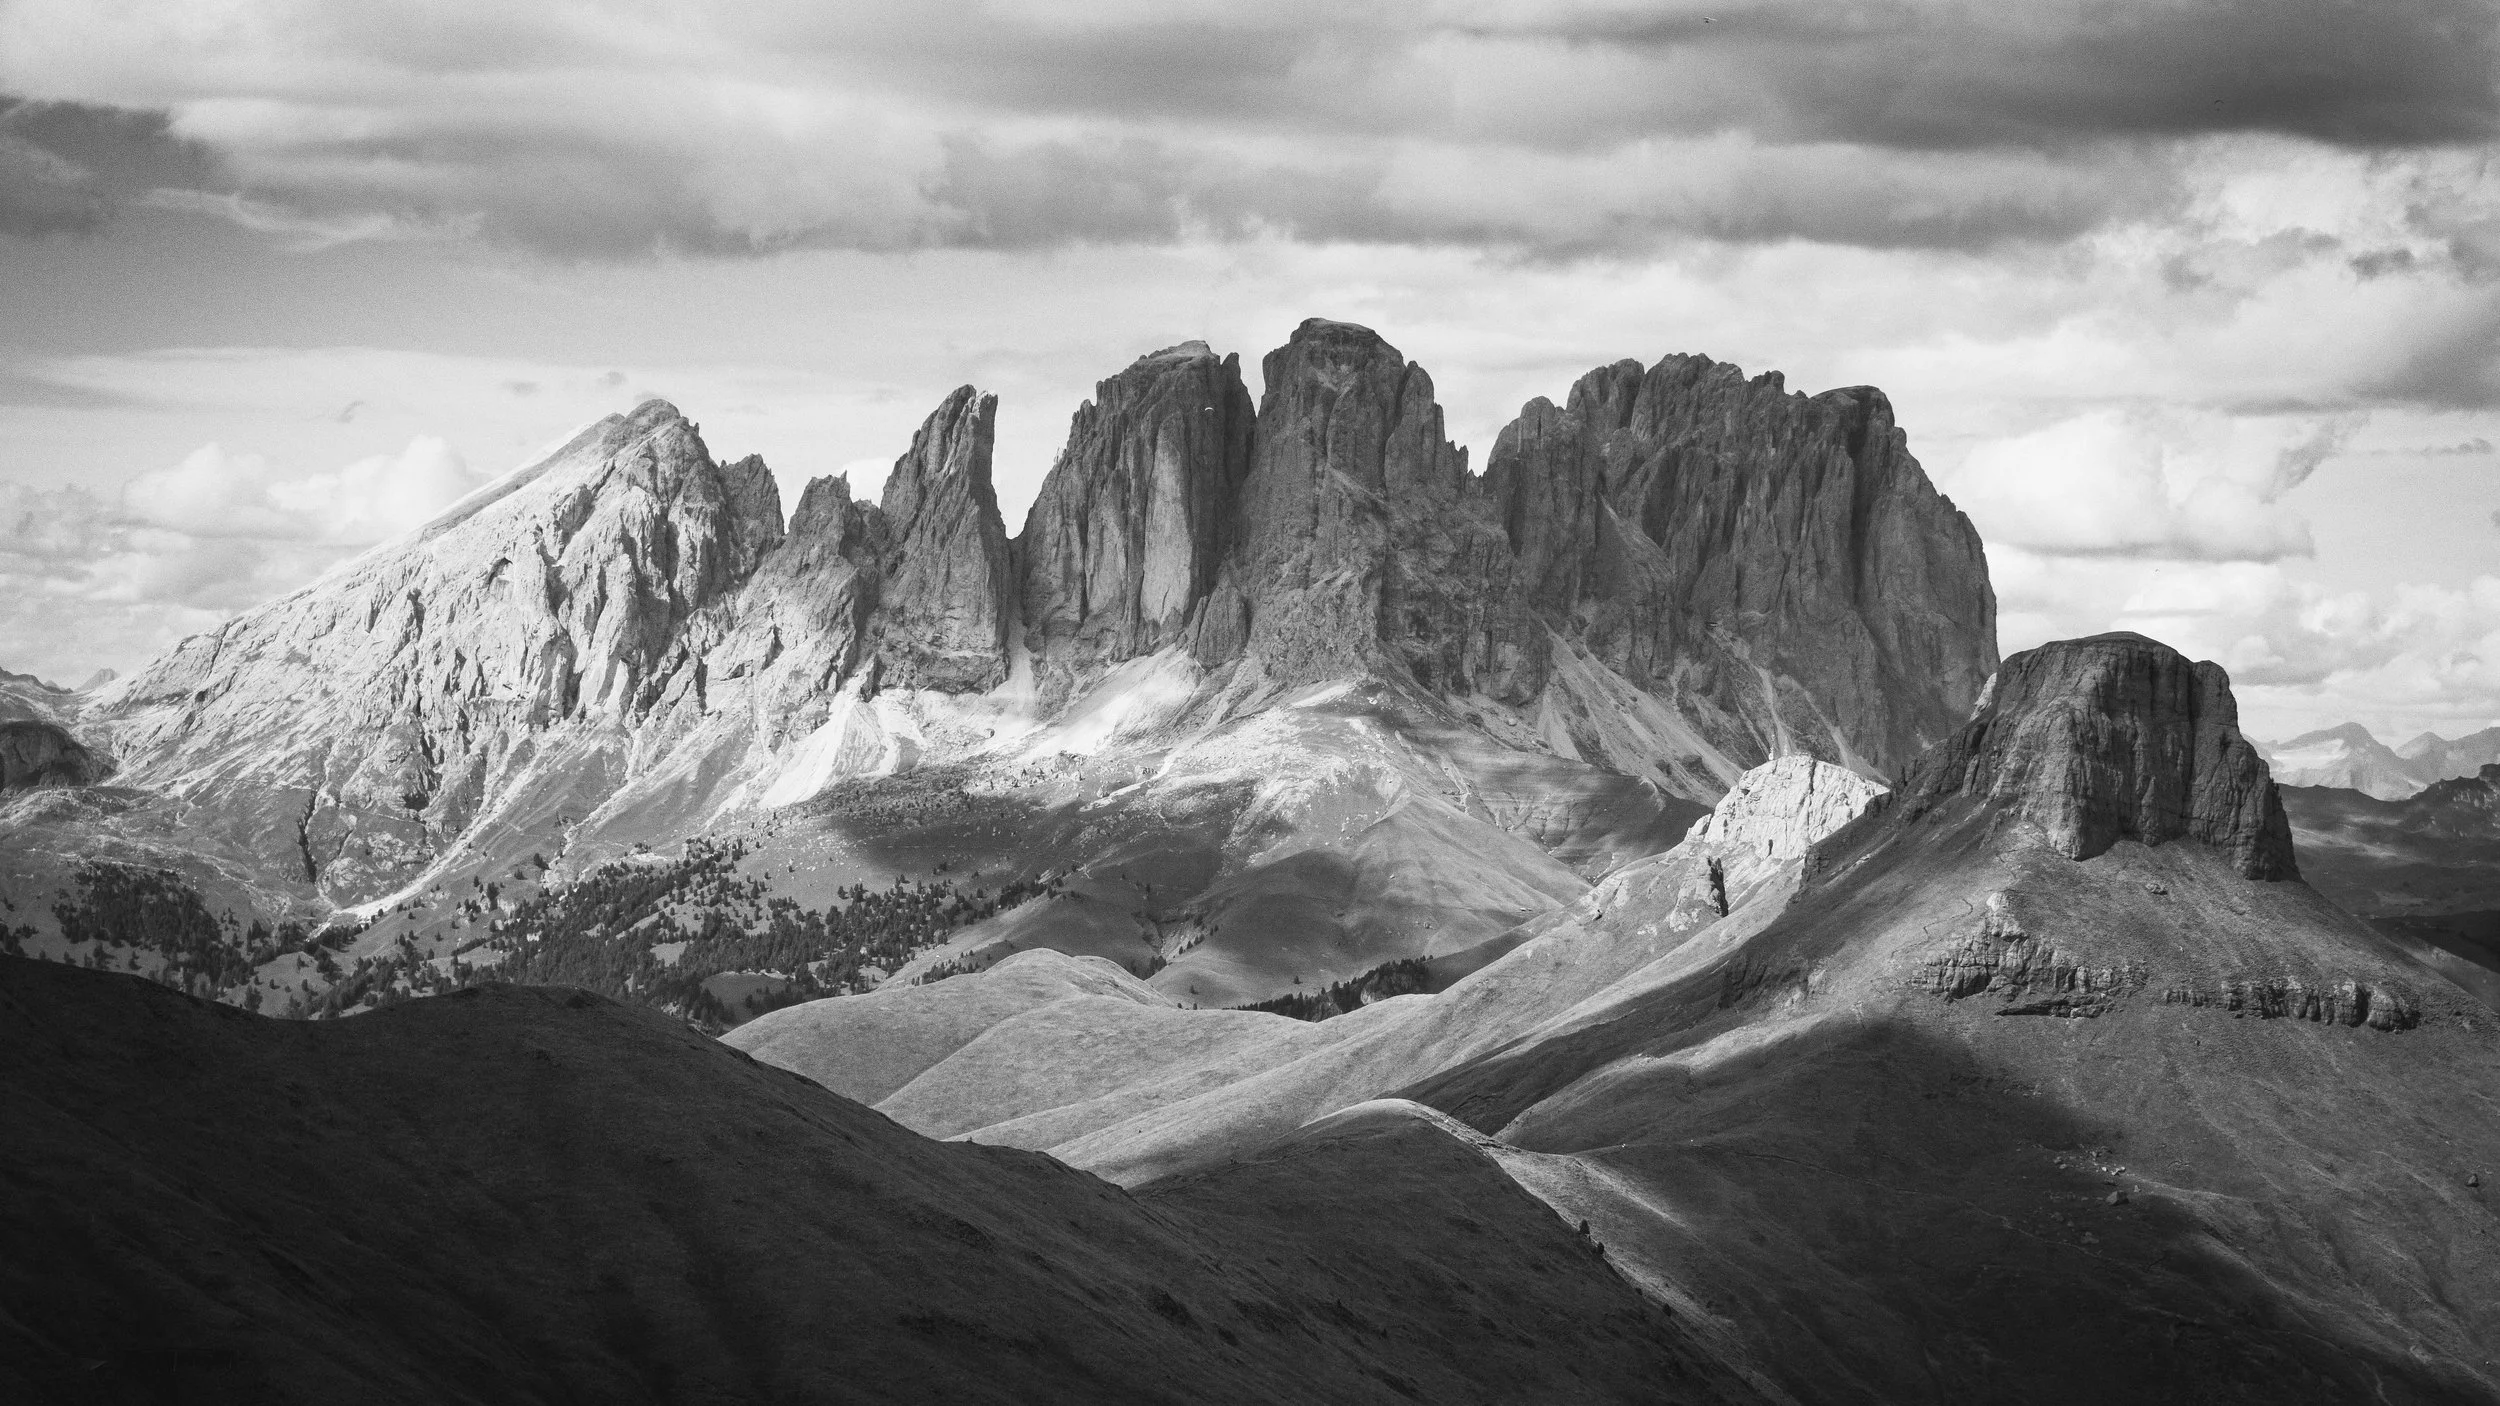
Grohmannspitze/Plattkofel
Fujifilm X-T5 | Acros Film Simulation
Tre Cime di Lavaredo
The most iconic location in the Dolomites, and the one that demands the most planning. Get it right and it's an exceptional day. Get it wrong and you'll spend two hours waiting for coaches. We did it the hard way so you don't have to.

Tre Cime from the caves
Fujifilm X-T5 | Reala Ace Film Simulation
Getting there, and book the parking.
There are two car parks: the main one near the top, close to the trailhead, and a lower one at the bottom for everyone who didn't book in time. If you're in the lower car park you'll need to buy return coach tickets, around €12 per person, and join the queue. We waited over an hour for a coach up. On the way back the queue looked like over two hours, so we walked down instead, an hour on tarmac road at the end of a long day, and it was a slog. Book the upper car park. It's the single most important practical note in this entire guide.
The Walk
From the upper trailhead, the Tre Cime loop is one of the great mountain walks, dramatic at every turn, with the three towers dominating the skyline throughout. We extended the standard loop to take in Rifugio Locatelli, where there are caves worth exploring, before continuing around the far side. Allow a full day.
The highlight was Punto Panoramico Dolomiti, the famous viewpoint that looks in the opposite direction to the Tre Cime themselves. If you've seen a single photograph of the Dolomites, it was probably taken from here, and it lives up to it in person.
Photography
The towers are the obvious subject, but the reverse view from the Punto Panoramico is the one worth walking for. The loop keeps them in sight from every angle, so it's a walk to shoot along rather than a single viewpoint to reach. The caves at Rifugio Locatelli are worth the detour too: from inside, the dark rock frames the peaks beyond, and a tripod lets you hold both the shadowed foreground and the bright mountains in one exposure.
Practical notes
Book the upper car park well in advance. Without it you're facing significant coach queues both ways.
The lower car park costs standard parking rates plus roughly €12 per person for return coach tickets.
The walk down from the upper car park to the lower one is on tarmac road, fine as a last resort but not a pleasant end to a big day.
Extend the loop to Rifugio Locatelli for the caves.
Allow a full day.
Verdict: The most famous walk in the Dolomites, and it earns the reputation. Just book the parking.
Punto Panoramico
Fujifilm X-T5 | Reala Ace Film Simulation
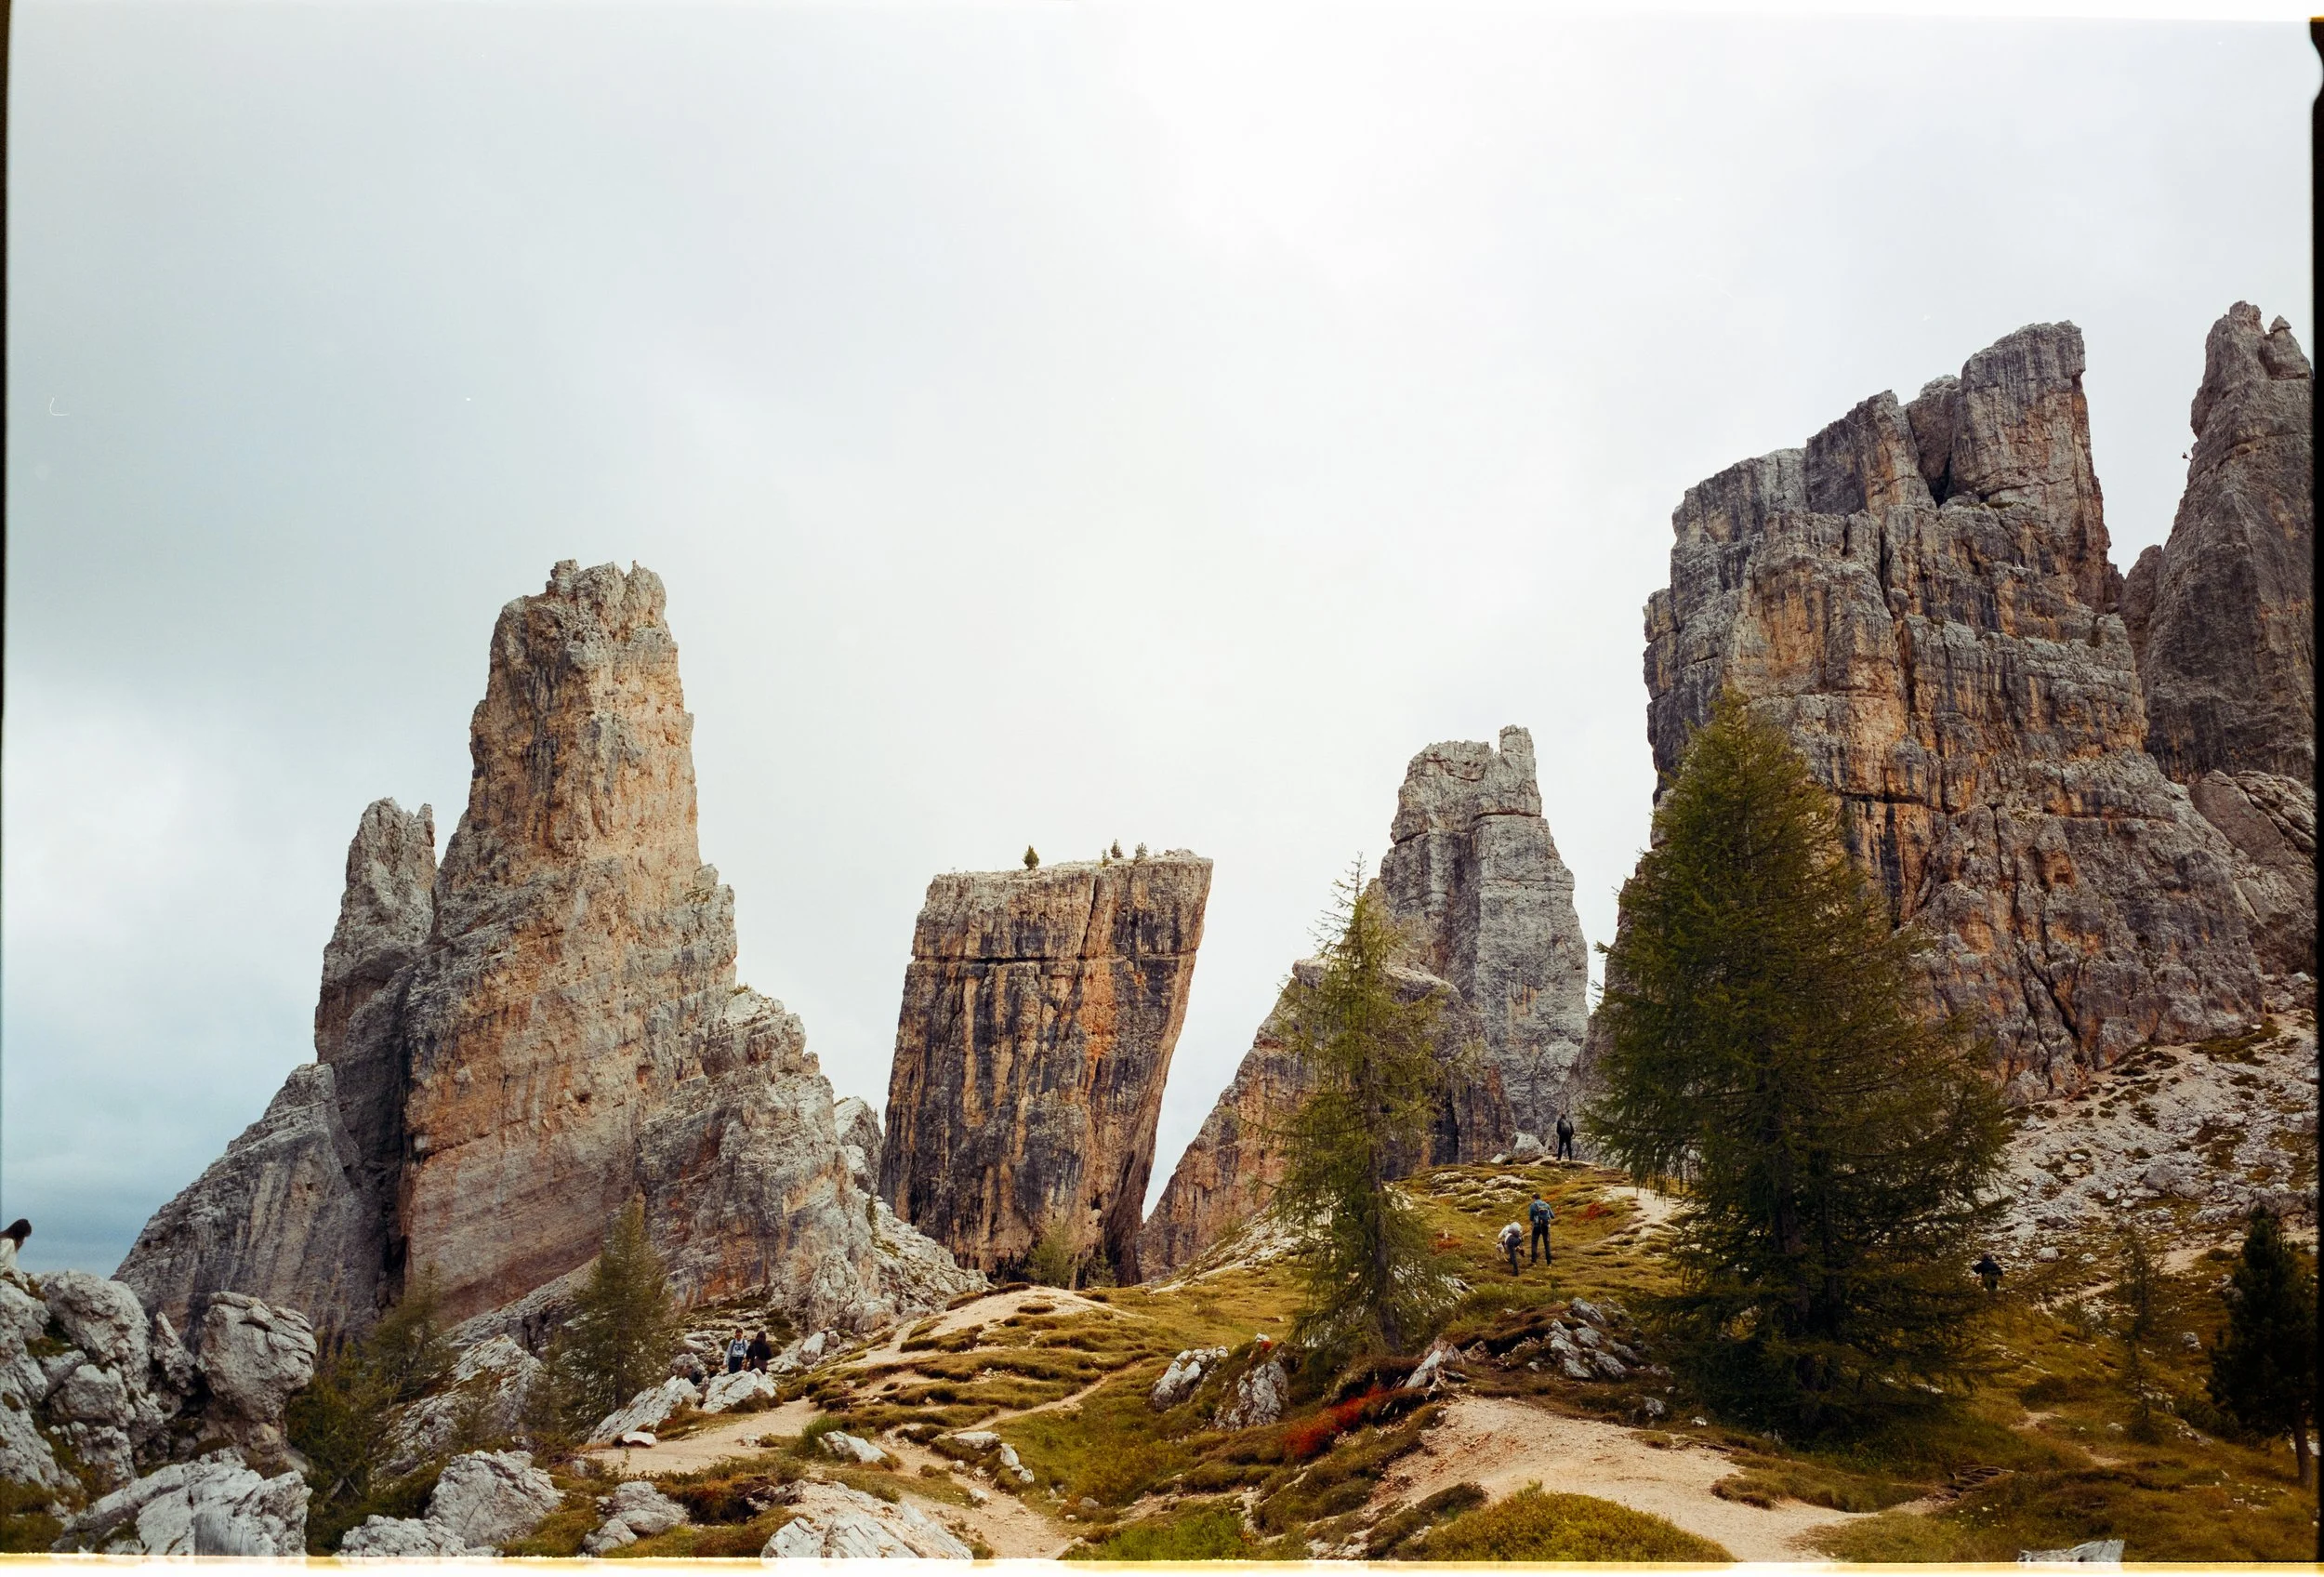
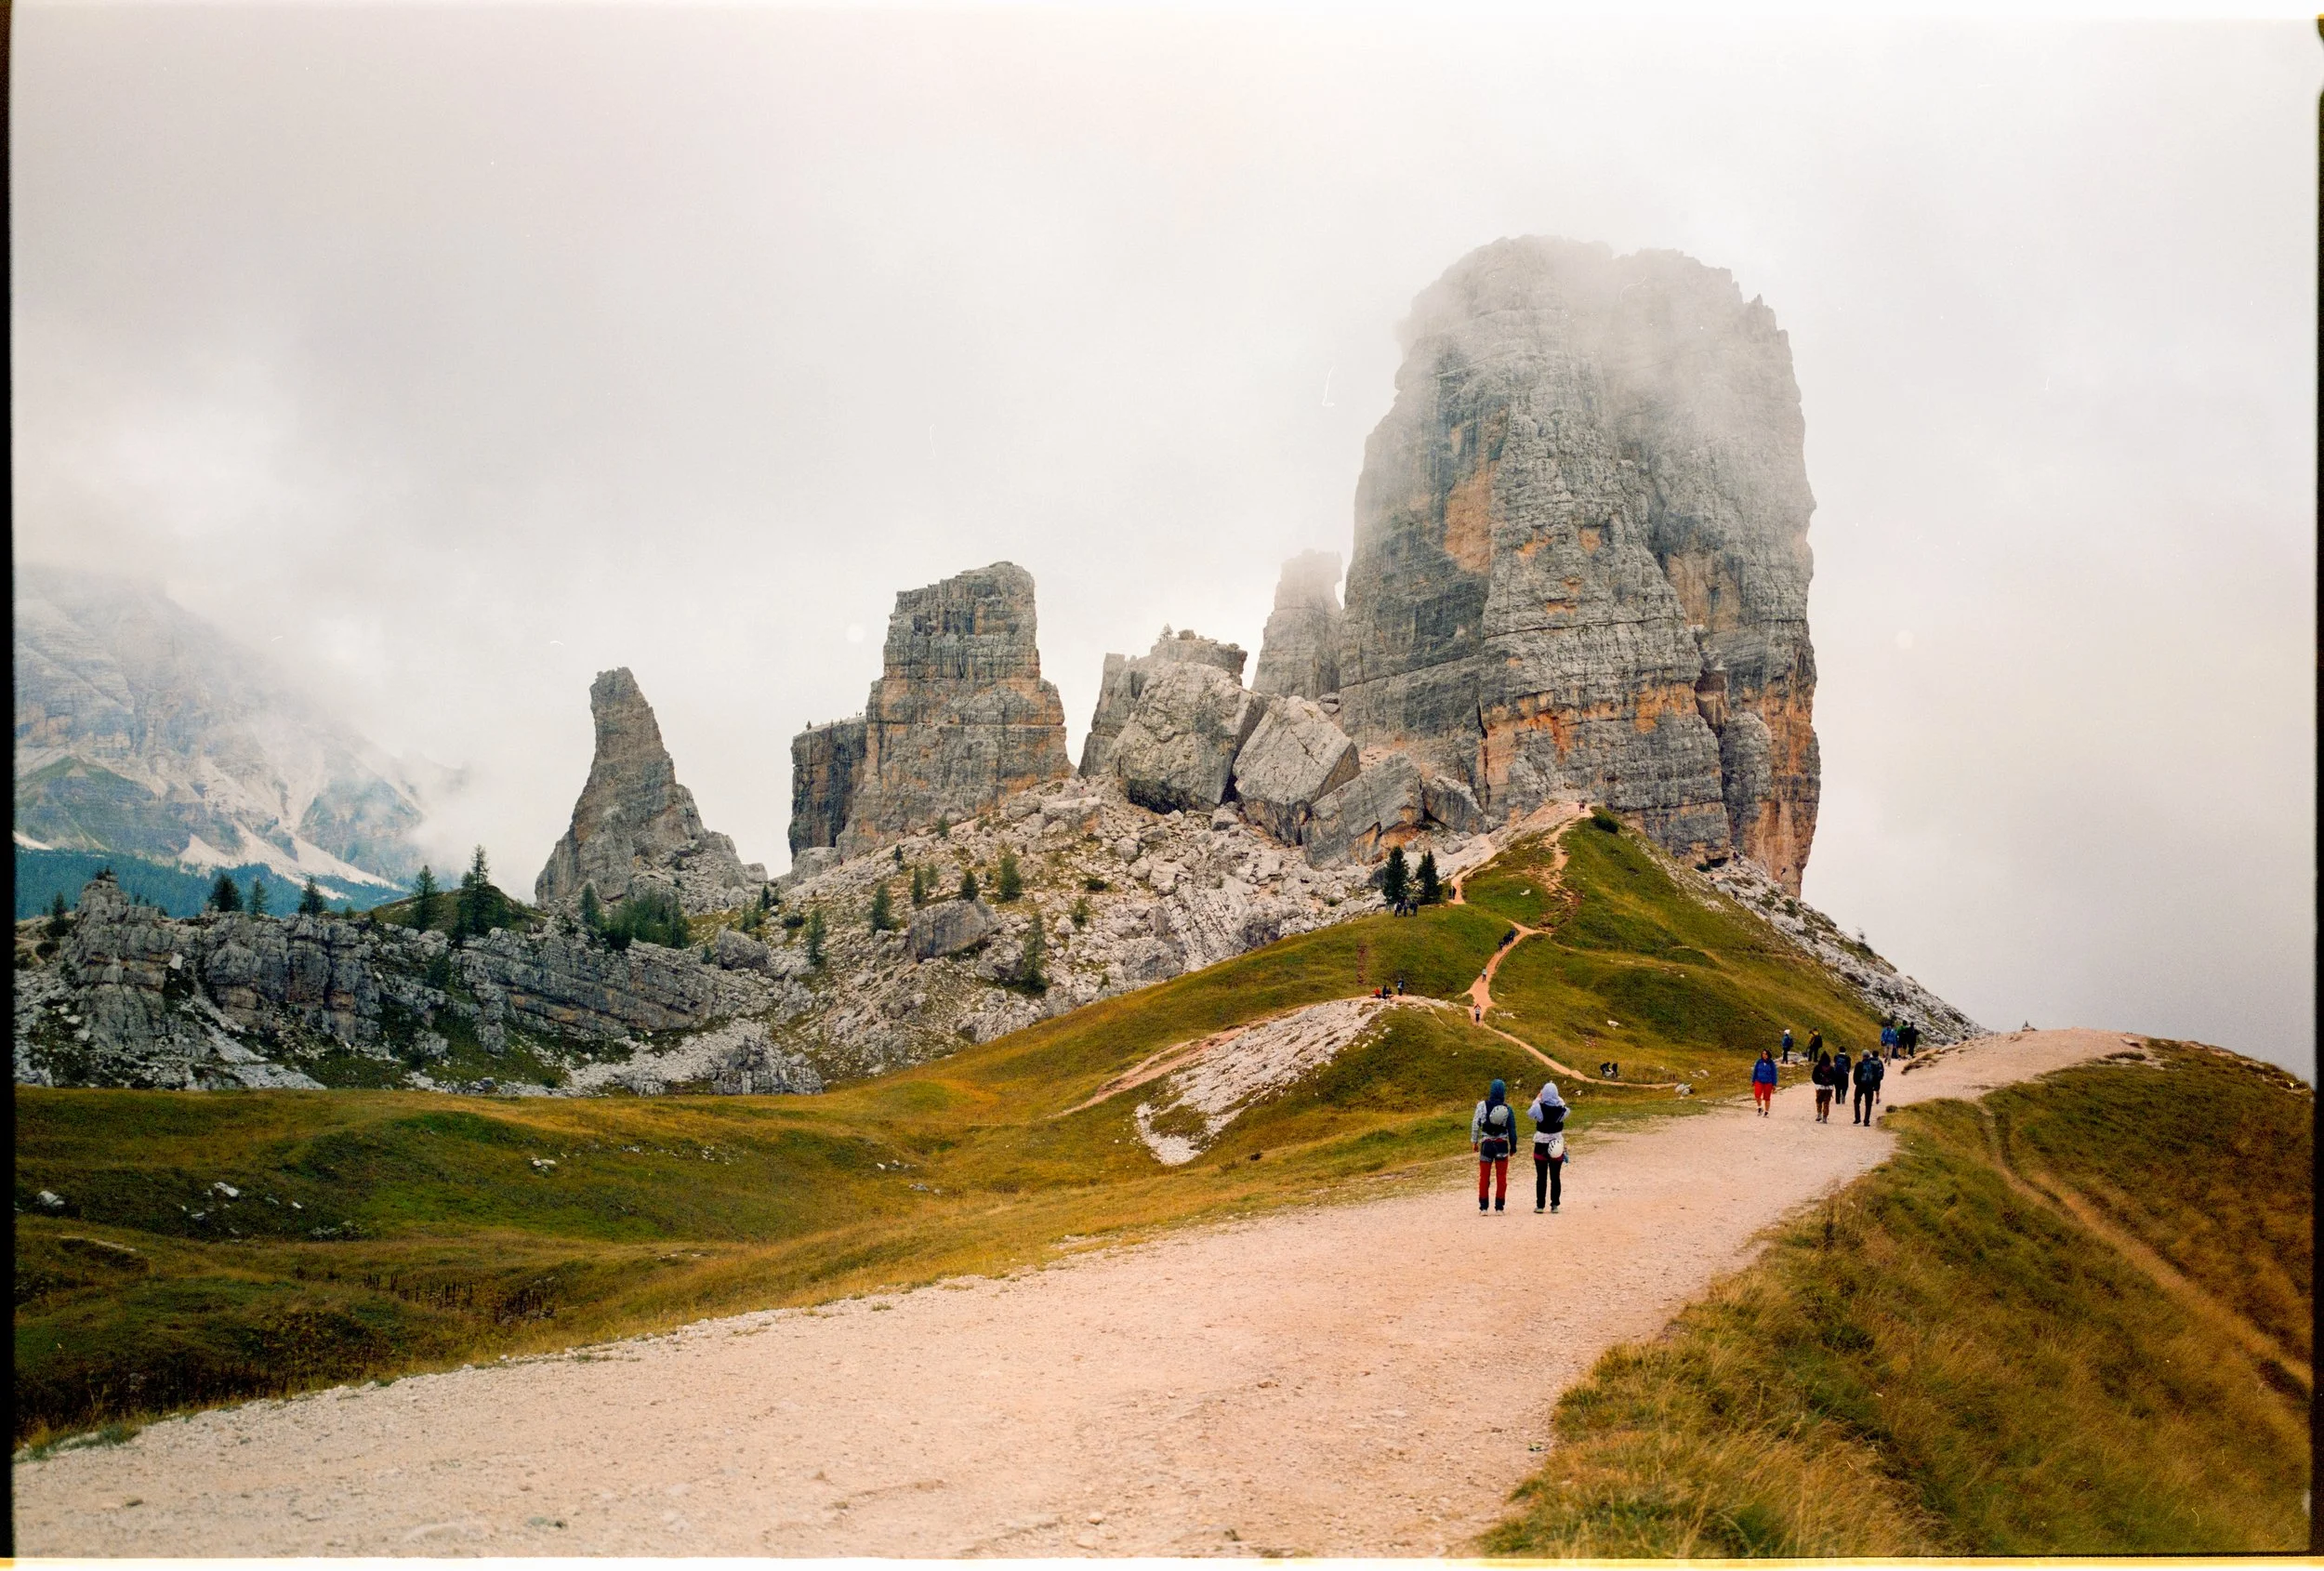
Cinque Torri
Five distinctive rock towers rising from a high plateau above Cortina. Less dramatic in scale than Tre Cime or Seceda, but a rewarding location for photographers who enjoy working with geometry and form. This is a place to explore rather than a single viewpoint to arrive at.
Cinque Torri
Fuji GSW 690 | Fujicolor Pro 400H
Getting there
Free parking at the trailhead, which makes a pleasant change. The hike up takes an hour to an hour and a half at an easy pace, one of the more accessible walks of the trip.
The walk
You can take a gondola directly to the towers, but walk up instead. The hike is straightforward and not too long, and arriving on foot makes the towers more satisfying when they finally appear. Once you're there, the pleasure is wandering in among the formations. The towers are clustered close enough that you can move between them, look up at climbers on the faces above, and find your own lines and angles.
Photography
The overcast sky on our visit wasn't ideal for dramatic light, but the geometry of the towers more than made up for it. The best compositions came from moving just a few metres to find positions where all five towers lined up in a single frame, and small adjustments make a real difference here. It rewards patience and exploration over a single hero shot. Timed for golden hour, the light on the rock faces would be extraordinary.
Practical notes
Free parking at the trailhead.
Walk up rather than taking the gondola. It's an easy hike and worth it.
Go at golden hour if you can. The geometry plus good light would be exceptional.
Verdict: A striking location, and one of the best on the list for working with form and composition. A very enjoyable half day, and easy to pair with another spot nearby.
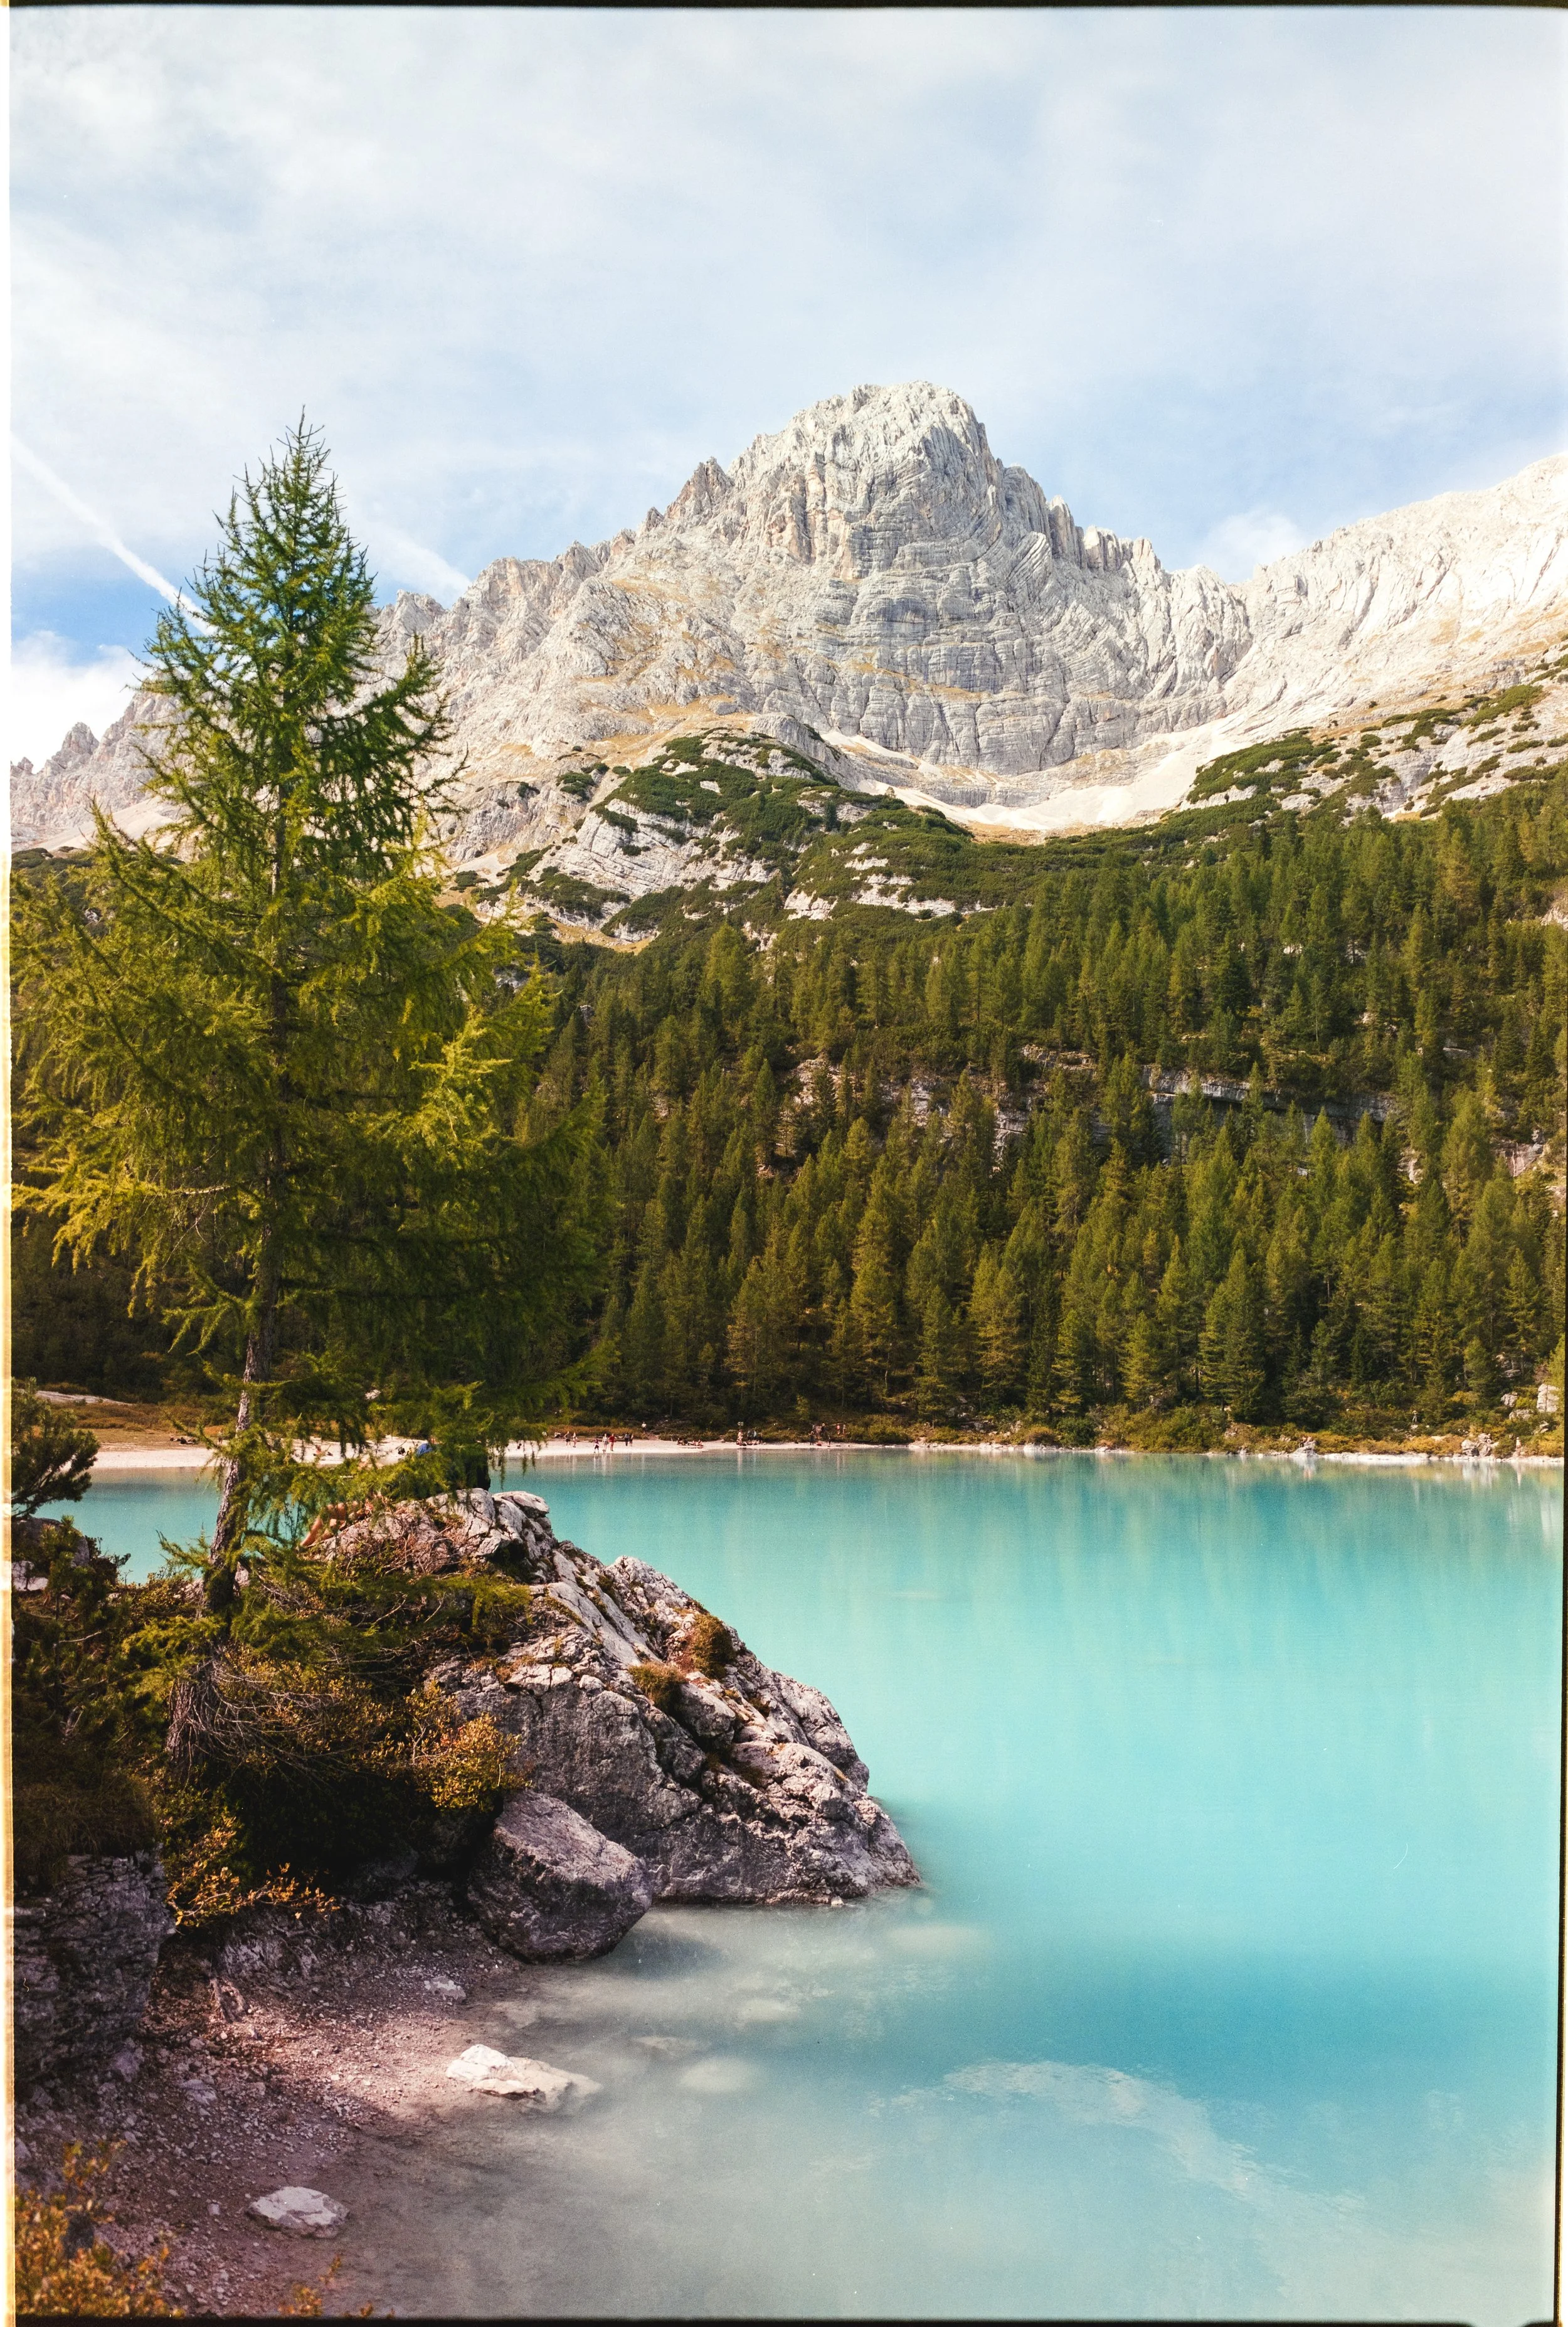
Lago di Sorapis
The most physically demanding day of the trip, and the most rewarding. The lake at the top has a colour that stops you short, an intense, almost unreal blue against the grey limestone. Worth every metre of ascent.
The lakeside view of Sorapis
Fuji GSW 690 | Fujicolor Pro 400H
Getting there
Skip the main trailhead and take the Sorapis Loop, the alternative route that starts a little further along the road. Park on the roadside right by the trail start, past all the cars queuing for the main path. The difference in crowd levels is significant.
The walk
The AllTrails description doesn't undersell this one. It's a severe route, steep and scrambly, with a strenuous scree section climbing through Forcella Marcoira before the descent to the lake. You need no equipment beyond good boots and the confidence to scramble, and there are ladders and some fun climbing sections that ask for nimbleness rather than technical skill. The reward is almost complete solitude on the way up, which after a week of popular trailheads feels extraordinary.
Rifugio Vandelli sits near the lake, worth knowing about if you want to split this into two days, with small dormitory accommodation, shared facilities and €6 for a sleep sack.
The descent to the lake is followed by a return along cliff-edge paths with sweeping views of the Cristallo and Sorapis groups, stunning in their own right and a completely different character to the ascent.
Photography
The lake is the main event. The blue is unlike anything else on the trip, and you can get right to the water's edge for compositions with the mountain backdrop behind. The cliff-edge paths on the return offer some excellent elevated shots too, but it's the lake that will fill your memory card, or your film canister.
Practical notes
Take the Sorapis Loop alternative route, not the main trail. It's quieter and more interesting.
Park on the roadside past the main trailhead car park.
No technical equipment needed, but you must be fit, sure-footed and comfortable scrambling.
Rifugio Vandelli near the lake makes a two-day version possible.
Allow a full day.
Verdict: Our most rewarding hike of the trip. The lake colour alone justifies everything it takes to get there.
Cliff edge walking on the way back
Fujifilm X-T5 | Reala Ace Film Simulation
Cascate di Fanes
A shorter walk that earns its place precisely because of that. When the forecast turns against you, this is the answer: free parking at the trailhead, around two hours of walking, and an impressive waterfall at the end.

Cascate di Fanes
Fujifilm X-T5 | Reala Ace Film Simulation
Getting there
Free parking directly at the trail start, one of the easiest access points of the trip.
The walk
A gentle hour or so to the waterfall, short enough to fit around an afternoon of uncertain weather and a good change of pace after the bigger days. The waterfall is impressive in scale, though the flow when we visited wasn't at its most ferocious, so a wetter day likely helps.
Getting down to the base looks possible but requires via ferrata gear, helmet, harness and carabiners. We didn't have the equipment so viewed it from above. The route looked excellent from what we could see, one to return for properly equipped.
Photography
Good rather than exceptional. The waterfall is a solid subject and the surrounding landscape is pleasant, but this isn't a location that will define your trip photographically. Come for the walk and the experience rather than headline shots.
Practical notes
Free parking at the trailhead.
Around two hours walking, good for a rain day or a shorter afternoon.
Reaching the base of the falls requires via ferrata gear: helmet, harness, carabiners.
Flow will be more dramatic after rainfall or earlier in the season.
Verdict: A solid half day and a smart choice when the weather closes in. Not the most dramatic location on the list, but it earns its place.
4. Photography Tips
The Dolomites are an extraordinary place to photograph, but they reward preparation and intention more than luck. A few things we learned across two weeks.
Shoot the light, and know what these mountains do with it. The pale dolomite rock holds warm light rather than reflecting it, and at sunrise and sunset the peaks turn pink and gold, an effect the locals call enrosadira. It's the signature of the range, and the difference between a flat midday frame and a memorable one. If photography is your priority, structure your days around early mornings and late evenings at the key locations rather than shooting whatever you pass at noon.
Work around your hiking if you have to. Our trip was primarily a hiking holiday, so we were mostly shooting in daylight. You can still get strong results, because the landscapes are dramatic enough to carry midday light, but the famous ridgelines at dawn or dusk are a different thing entirely. Plan the ones you care about most around the good light.
Shoot panoramics. Some of these landscapes are simply too wide for a single frame. Stitching in Lightroom is straightforward and the results can be spectacular, and Lago di Fedaia in particular lends itself to it. Bracket generously and stitch later.
Try black and white. It sounds counterintuitive in a landscape famous for colour, but several of these compositions work beautifully in monochrome. The graphic quality of the rock faces and ridgelines translates well, so it's worth experimenting in post even if you didn't shoot for it in the field.
Bring a polarising filter. Essential for the lakes. Sorapis and Fedaia both have vivid, highly reflective water, and a polariser cuts the glare and brings out the colour in a way that's very hard to replicate afterwards.
Consider bringing film. I shot the trip on a Fujifilm X-T5 for digital and a Fuji GSW690 medium format film camera for the shots I really wanted to commit to. With only 32 exposures across the whole fortnight, every frame had to earn its place, and that discipline made me more intentional with the digital shooting too. You don't need to shoot film to take the lesson on board. Treating a handful of shots per location as your considered frames, and the rest as exploration, is useful whatever you're shooting with.
Don't ignore the details. The Dolomites are so vast that it's easy to spend the whole trip shooting wide. Some of the most interesting frames come from the smaller things: a cafe terrace at Seceda, the cave mouths at Tre Cime, a peak framed at the end of a cable car. The landscape will look after itself, so make sure you're also looking at what's immediately around you.
Bring a tripod, but don't feel tied to it. It earns its place for long exposures at waterfalls and for careful panoramic work. For most of the hiking locations you'll be moving too much to set it up regularly.
5. Practical Advice

Before you go
Book the Tre Cime upper car park well in advance. This is non-negotiable.
Check the forecast before committing to your biggest photography walks, and save the iconic spots for the clearest days.
Take out comprehensive car hire insurance at the desk. It feels like an upsell until you need it.
Download AllTrails maps for every walk before you leave your accommodation. Mobile signal in the mountains is unreliable.
Getting around
An SUV makes roadside parking far less stressful.
Popular car parks fill early, so arriving late often means a roadside verge or a coach queue.
Driving around the Dolomites is straightforward. Parking is the only real headache.
On the trail
Bring a serious waterproof, not an afterthought.
Carry a portable battery pack if you're relying on your phone for navigation.
Pack your own lunch. Self-catering from an AirBnB keeps costs down and Italian produce is excellent.
Mix famous walks with quieter local ones. The crowds at the iconic spots can erode the alpine feeling you came for.
Use AllTrails to find shorter walks on rain days rather than writing the day off.
Accommodation
Stay in AirBnBs in smaller villages rather than hotels in Cortina. Better value, more flexibility, and a more authentic experience.
Look for a place with outdoor space. Evenings in the Dolomites are worth sitting outside for.
Food
The food isn't as strong as elsewhere in Italy, but there are real gems in the smaller villages, so it's worth exploring beyond the obvious options.
Pizza in particular can be excellent, so don't write a place off for a short menu or modest reviews.
Timing, in short
Early September for guaranteed access, stable weather, thin crowds and clear air, but green larches.
Early to mid-October for peak autumn colour, at the cost of lift and rifugio closures, early snow and more weather risk.
June for wildflowers and long days, with afternoon storms and some lingering high-altitude snow.